

Indulge in the irresistible crunch and rich chocolate flavor of these incredibly easy-to-make No-Bake Cornflake Cookies! Requiring minimal effort and no oven, a batch of these delightful treats can be ready in just about 20 minutes of active preparation time, though a short chill period is recommended for optimal setting. They are a beloved staple in our household throughout the year, but truly shine as a festive favorite during the holiday season. Perfectly portioned, they make an ideal movie night snack or a thoughtful, edible gift for friends and family.
The holiday season always calls for simple yet satisfying cookie recipes that bring joy without the fuss. Beyond these crowd-pleasing Cornflake Cookies, we often find ourselves whipping up other cherished treats like Nutella Cookies, elegant Linzer Cookies, and charming Gingerbread Christmas Brownies. Each offers a unique flavor profile, but all share the common thread of being wonderfully approachable for home bakers.

Why You’ll Love These No-Bake Cornflake Cookies
These chocolate cornflake no-bake cookies quickly become a favorite for anyone who tries them. Their simplicity and universal appeal make them a standout recipe for any occasion. Here’s why they’re an absolute must-try:
- Effortlessly Easy: With no oven required, these cookies are perfect for beginner bakers or anyone looking for a quick dessert solution. The entire active process, from melting chocolate to mixing and forming, takes mere minutes.
- Minimal Ingredients: You only need three core ingredients – chocolate, cornflakes, and slivered almonds – making them a budget-friendly and readily accessible treat.
- Customizable to Perfection: Whether you prefer them dainty and bite-sized or generously large, these cookies can be shaped to your liking. They are also incredibly versatile for ingredient variations.
- Kid-Friendly Fun: The straightforward steps make this recipe an excellent opportunity to get children involved in the kitchen. They’ll love mixing the ingredients and forming the cookie clusters!
- Year-Round Delight: While they make a fantastic holiday cookie, their quick preparation and refreshing crunch are equally enjoyable during warmer months when you want to avoid turning on the oven.
- Perfect for Gifting: Beautifully packaged, these chocolatey clusters make charming homemade gifts for neighbors, teachers, or hosts.
Inspired by a German Classic: Schoko-Crossies
The inspiration for these delightful cookies comes from one of my husband’s cherished German treats: Schoko-Crossies. These popular confections are essentially chocolate-covered cornflake clusters, a simple concept that yields incredibly satisfying results. Living here in Canada, authentic Schoko-Crossies are hard to come by, which led us to embark on the enjoyable task of recreating them at home. Luckily, making your own is surprisingly simple and allows for complete customization with your favorite chocolate varieties. This recipe is also a brilliant way to utilize any leftover chocolate from Christmas or Easter, giving those holiday remnants a delicious second life.

How to Make Perfect No-Bake Cornflake Cookies
Crafting these chocolate cornflake cookies is a straightforward and rewarding process. Follow these simple steps for a batch of perfectly crunchy and chocolatey treats.
Ingredient Spotlight:
Chocolate Choice Matters for the Best Results
The quality of your chocolate significantly impacts the final taste and appearance of your cookies. We highly recommend using good quality chocolate bars over chocolate chips when possible. Higher quality chocolate typically melts smoother, tastes richer, and is less prone to “blooming.” Blooming is when cocoa butter separates and rises to the surface, creating a whitish or streaky appearance, which, while harmless to taste, can affect the aesthetic. If you do use chocolate chips, be aware they sometimes contain stabilizers that can make them harder to melt smoothly or they might already show signs of bloom. For bar chocolate, break or chop it into smaller, uniform pieces to ensure it melts evenly and quickly.
You have a wonderful range of choices when it comes to the type of chocolate. Dark chocolate offers a deep, intense flavor, perfect for those who enjoy less sweetness. Semisweet chocolate provides a balanced profile, while milk chocolate delivers a creamy, sweeter bite. For a truly exquisite flavor, a blend is often best. I personally prefer a mixture of 2/3 semisweet chocolate and 1/3 milk chocolate to achieve a harmonious balance of sweetness and depth.
Achieving a Smooth, Shiny Finish: Simple Chocolate Tempering
While traditional chocolate tempering involves precise temperature control with a thermometer, there’s an easier method to achieve similar results and prevent chocolate bloom, resulting in glossy, smooth cookies with a satisfying snap. Simply melt about 2/3 of your chosen chocolate using a double boiler or microwave. Once melted, remove it from the heat and stir in the remaining 1/3 of un-melted chocolate. Continue stirring until all the chocolate is completely smooth and melted. This process gently cools the chocolate, aligning the cocoa butter crystals and giving your finished cookies a beautiful shine and firm texture.
The Essential Crunch: Cornflakes
Cornflakes are the backbone of these cookies, providing that signature crunch. While plain cornflakes are my go-to choice, offering a neutral base that lets the chocolate shine, frosted flakes can also be used if you prefer a sweeter cookie. Just be mindful of the added sugar if you opt for the frosted variety.
Adding Texture and Richness: Slivered Almonds
Slivered almonds are thin, stick-like slices of almond that integrate beautifully into the clusters without being overly chunky. They add a lovely nutty flavor and another layer of texture. If slivered almonds aren’t available, you can roughly chop whole almonds. For those with nut allergies, sunflower or pumpkin seeds can make excellent substitutes, offering a similar crunch and earthy flavor.
Step-by-Step Instructions
-
Begin by preparing your dry ingredients. In a large mixing bowl, gently combine the slivered almonds and cornflakes. Set this mixture aside. Next, prepare your workspace for the formed cookies by lining one large or two smaller baking sheets with parchment paper or wax paper. It’s a good idea to ensure these sheets fit comfortably in your refrigerator or freezer for chilling.
-
Proceed to melt your chocolate. You can use a microwave, heating in 30-second intervals and stirring thoroughly between each, until about 3/4 of the chocolate is melted. Alternatively, create a double boiler by setting a heatproof metal or glass bowl over a saucepan of simmering water, ensuring the bottom of the bowl does not touch the water. Stir gently until 3/4 of the chocolate is melted. Once primarily melted, remove the bowl from the heat and stir in the remaining 1/4 of the un-melted chocolate until it’s completely smooth and glossy. This simple tempering method helps prevent blooming and gives your cookies a beautiful finish.
-
Carefully pour the smoothly melted chocolate over the almond and cornflake mixture in the large bowl. Using a rubber spatula, gently stir everything together until the cornflakes and almonds are evenly coated with chocolate. This process should take about 1-2 minutes. Avoid stirring too aggressively to prevent crushing the cornflakes too much.
-
Once fully coated, use two teaspoons to scoop and form small, teaspoon-sized heaps of the mixture onto your prepared baking sheets. Continue this process until all the mixture has been used, leaving a little space between each cookie.
-
To set the cookies, chill them in the refrigerator for approximately 30 minutes, or in the freezer for about 15-20 minutes, until the chocolate is completely firm. If you don’t have fridge space, you can also leave them in a cool, dry place for about 3 hours. Once set, transfer the cookies to an airtight container and store them in a cool, dry place to maintain their crunch and freshness.

Expert Tips and Tricks for Making the Best Cornflake Cookies
Achieving perfect cornflake cookies every time is simple with a few insider tips:
- Understanding Slivered Almonds: “Slivered” almonds are specific – they are thinly sliced into small, elongated sticks. This shape allows them to distribute evenly and add a pleasant crunch without overpowering the texture. If you can’t find them, coarsely chopped almonds are a suitable alternative.
- Cornflake Variety: While plain cornflakes are recommended for a classic balance of sweetness, frosted flakes can be used for an extra-sweet treat. Just be mindful that they will contribute more sugar to the overall cookie.
- Customizing Chocolate: Feel free to experiment with different types of chocolate to suit your preference. Dark chocolate, semisweet, or milk chocolate all work beautifully. A popular choice is a blend, such as 2/3 semisweet and 1/3 milk chocolate, for a nuanced flavor profile.
- Melting Chocolate Safely: For the smoothest melt, consider using a double boiler (a heatproof bowl set over a saucepan of simmering water, ensuring the water doesn’t touch the bowl) or a microwave (heating in short bursts and stirring frequently). If using a pan directly on the stove, keep the heat very low and stir continuously to prevent the chocolate from burning, as this method carries a higher risk.
- Preventing Chocolate Bloom (Revisited): The simple tempering method of melting 2/3 of the chocolate and stirring in the remaining 1/3 off the heat is crucial for a shiny, professional-looking cookie. Ensure the chocolate you stir in is not already bloomed (i.e., doesn’t have a whitish film), as this can encourage blooming in the final product.
- Gentle Mixing is Key: Don’t worry if a few cornflakes break during mixing; it’s natural. However, stir with a light hand and avoid aggressive movements to preserve as much of their flaky texture as possible.
- Efficient Chilling: For quick setting, chilling the cookies in the fridge or freezer is highly effective. Before you start placing cookies, always ensure your baking sheet fits comfortably in your refrigerator or freezer to avoid last-minute scrambling.
- Don’t Stress About Bloom: If your chocolate does bloom, rest assured it only affects the visual appearance (a whitish, dull finish) and not the taste or safety of the cookies. Chocolate chips and chocolate that has already bloomed are generally more prone to this.
- Storage for Longevity: Store your finished cornflake cookies in an airtight container at room temperature in a cool, dry place. They will maintain their crispness and flavor for up to two weeks, making them ideal for making ahead.
- Creative Variations: Elevate your cookies with additional mix-ins! Consider adding a pinch of sea salt for a sweet and salty contrast, a dash of cinnamon or nutmeg for a warming spice, or even mini marshmallows for added chewiness. Sprinkles can also add a festive touch for holidays or parties.
Serving Suggestions & Creative Variations
These versatile no-bake cornflake cookies are perfect for almost any occasion. Serve them alongside a cup of coffee or tea for an afternoon treat, add them to a dessert platter for a casual gathering, or simply enjoy them as a quick snack when a chocolate craving strikes. For even more fun, consider dipping half of each cooled cookie in a contrasting chocolate (like white chocolate) and decorating with festive sprinkles. You can also crush a few freeze-dried raspberries or strawberries and sprinkle them over the wet chocolate for a burst of color and tartness. Experiment with different nut varieties such as chopped pecans or walnuts for a different flavor profile, or introduce dried cranberries or chopped candied ginger for a unique twist.
More Christmas Cookies to Try
Cookies, Brownies & Bars
Linzer Cookies
Cookies, Brownies & Bars
Nut Corners (German Nussecken)
German Recipes
German Lebkuchen Recipe
German Recipes
Heidesand
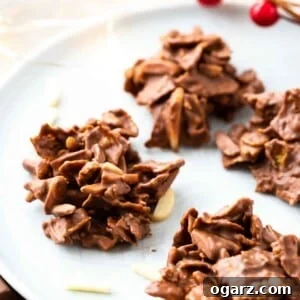
Cornflake Cookies
Ingredients
- 1/2 cup slivered almonds
- 2 cups cornflakes
- 7 oz chocolate, chopped or 1 cup chocolate chips
Instructions
-
Mix cornflakes and almonds together. Set aside. Cover one large or two smaller baking sheets with parchment or wax paper (make sure they fit in your fridge).
-
Melt 3/4 of the chocolate (chips) in the microwave or in a stainless steel bowl over a pot of simmering water. When chocolate is melted take off heat and stir in remaining chocolate until completely melted.
-
Pour over almond cornflakes mixture and carefully stir with a rubber spatula until everything is coated.
-
Use two teaspoons to make little heaps on the baking sheet until you used up all the mixture.
-
Chill in the fridge for about 30 minutes or in a cold and dry place for about 3 hours until chocolate has completely dried. Store in an airtight container in a dry and cool place.
Nutrition
Carbohydrates: 2g |
Fat: 1g |
Sodium: 7mg |
Potassium: 17mg |
Sugar: 1g |
Vitamin A: 15IU |
Vitamin C: 0.2mg |
Calcium: 3mg |
Iron: 0.4mg
Like this recipe? Rate and comment below!