
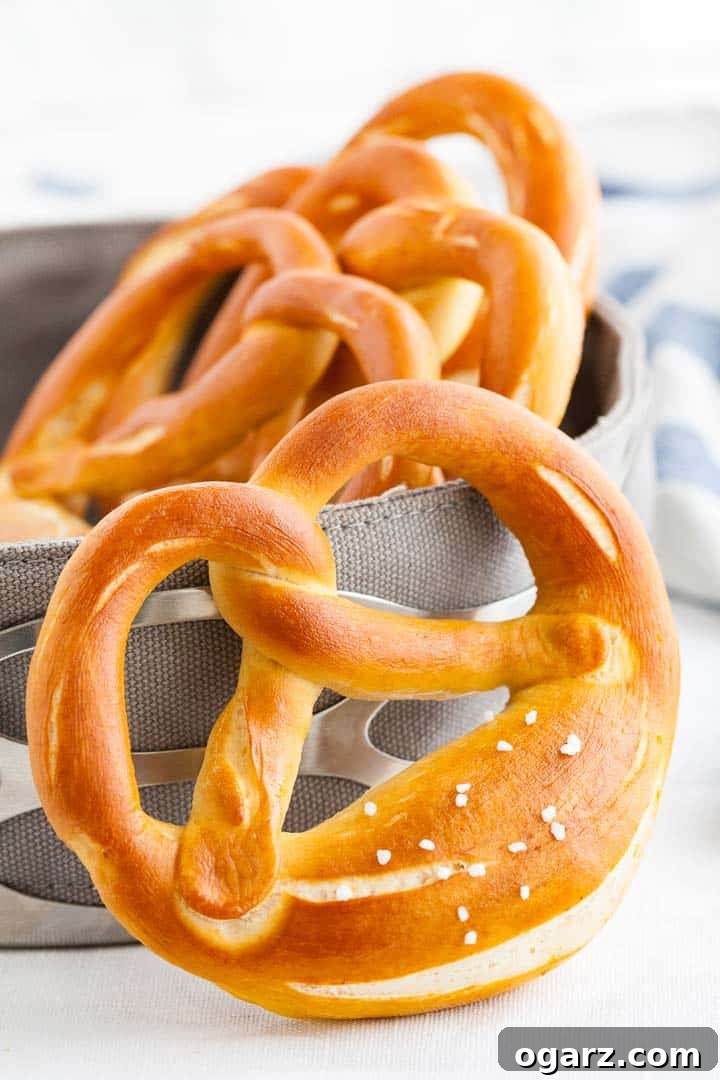
Step into the heart of Bavaria with this ultimate guide to crafting authentic German Pretzels right in your own kitchen! Known as Brezeln or Brezen across Germany, these iconic chewy, soft-on-the-inside, and deeply browned snacks are more than just a treat; they’re a cultural staple, especially during festive occasions like Oktoberfest. Forget store-bought versions – mastering this homemade German pretzel recipe is surprisingly straightforward, yielding results that rival your favorite German bakery. Imagine fresh, warm pretzels, perfect for dipping in a rich cheese sauce, a dollop of sweet mustard, or simply slathered with butter. This comprehensive recipe ensures you’ll have enough to delight a crowd, making them an ideal appetizer or snack for any gathering.
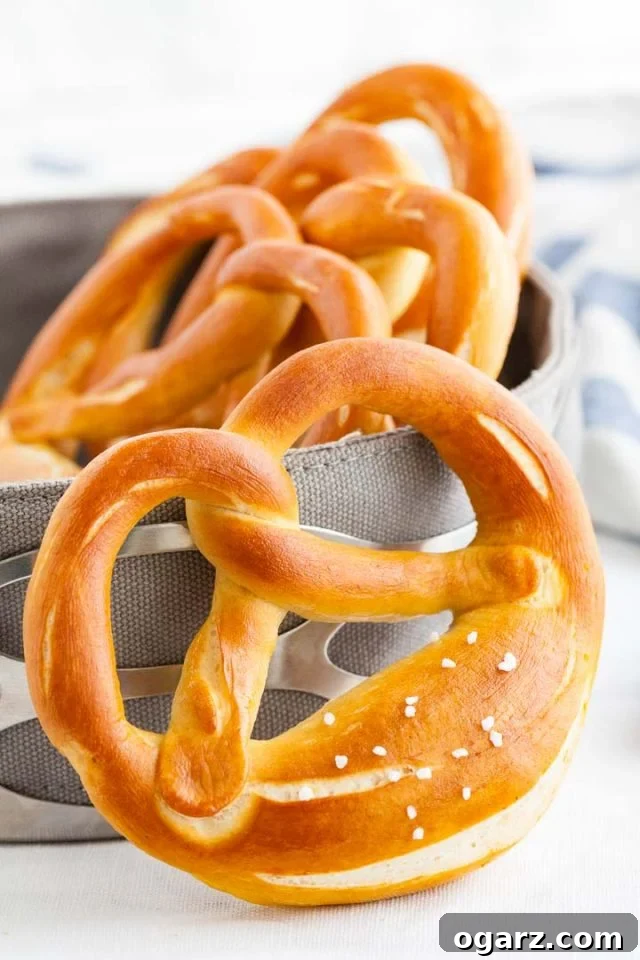
Many assume authentic Bavarian pretzels are complex to prepare, but with the right techniques and a few key tips, you’ll be baking perfect soft pretzels in no time. The distinct dark, shiny crust and the unique, slightly malty flavor of German pretzels come from a crucial step: a quick dip in an alkaline solution before baking. While traditional German bakeries use food-grade lye for its superior browning and texture, this recipe offers a safer, equally delicious alternative using baking soda. You’ll achieve that irresistible chewy interior and crisp, savory exterior that makes these German soft pretzels a beloved snack worldwide.
Authentic Bavarian Pretzels: Your Ultimate Guide to Homemade Perfection
German soft pretzels are perhaps one of the most beloved and famous baked goods hailing from Germany, distinguished by their unique shape, wonderfully chewy texture, and deep, lustrous brown crust. While they might appear daunting to make from scratch, the process is far simpler than you think, especially when you follow our detailed instructions and expert tips. The secret to their irresistible appeal lies in a simple yeast dough, meticulously shaped, briefly bathed in an alkaline solution, generously sprinkled with coarse salt, and then baked to a glorious golden-brown finish.
This comprehensive guide will walk you through every step, ensuring your homemade pretzels are nothing short of spectacular. Whether you’re preparing for an Oktoberfest celebration, a casual family snack, or simply craving the taste of true German comfort food, these Bavarian pretzels are guaranteed to impress. They are not only a treat for the palate but also a fun and rewarding baking project.

Crafting the Perfect German Pretzel Dough
The foundation of an authentic Bavarian pretzel is its dough. It’s a relatively simple yeast dough, but its preparation is key to achieving that signature chewy texture. Start by activating your yeast with lukewarm milk, water, and a touch of brown sugar or malt extract. This initial step creates a foamy mixture, indicating your yeast is active and ready to work its magic. Incorporate all-purpose flour, melted butter, and a hint of salt, then knead until the dough becomes smooth, elastic, and pulls away cleanly from the sides of the bowl. Proper kneading develops the gluten, which is essential for the pretzel’s characteristic chewiness.
Once kneaded, the dough needs time to rise. Place it in a warm environment, covered, and allow it to double in size, typically around an hour. This proofing period allows the yeast to ferment, creating air pockets that contribute to the pretzel’s light yet robust interior. Patience during this stage is a virtue, as it directly impacts the final texture and flavor of your pretzels. A well-risen dough is easier to work with and produces superior results.
Mastering the Iconic German Pretzel Shape
The distinctive shape is what sets German pretzels apart from their American soft pretzel counterparts. Unlike uniform ropes, authentic German pretzels feature a thicker, plump middle section that tapers into thin, crispy ends. This creates a beautifully defined shape with three distinct holes that won’t bake into a shapeless bun. Achieving this specific form is crucial for both aesthetics and texture.
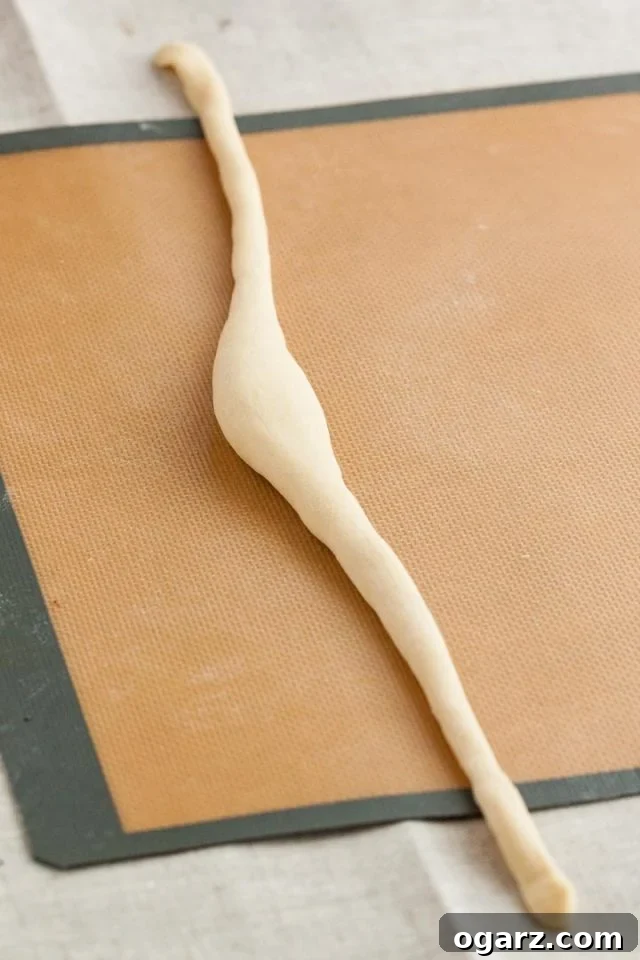
Begin by dividing your risen dough into equal portions. Take one piece and, using your hands, roll it into a long rope, approximately 16 inches (40 cm) in length. The trick here is to ensure the middle section, about 2 inches (5 cm) long, bulges to a diameter of roughly 1.2 inches (3 cm), while the ends are stretched and thinned out to about 0.3 inches (0.75 cm). This gradient in thickness is fundamental to the pretzel’s unique structure.
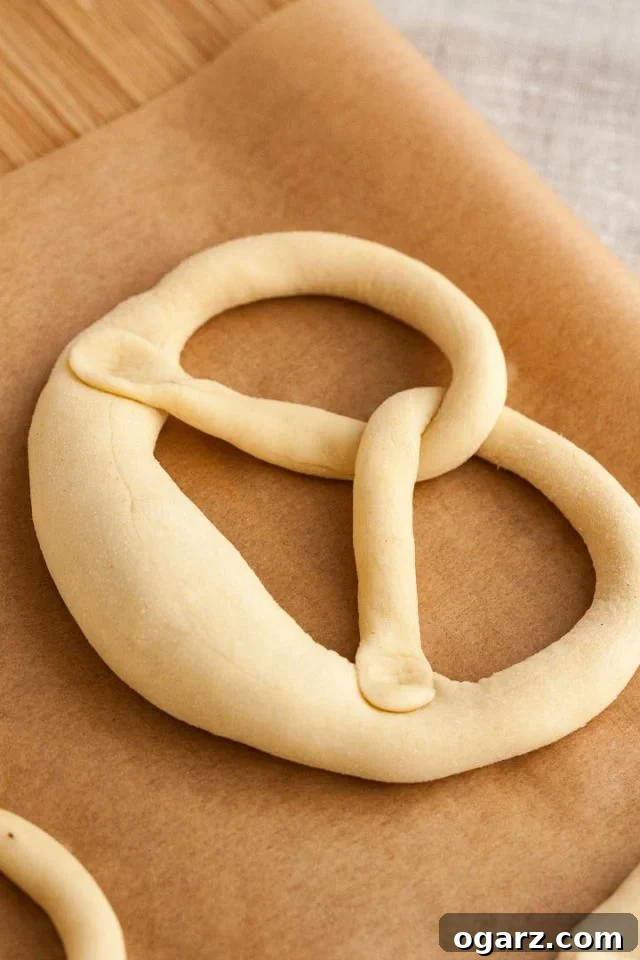
Once you have your tapered rope, it’s time to twist. Bring the two thin ends of the dough together to form a circle, then cross one end over the other, twisting them twice. This creates the characteristic pretzel knot. After twisting, gently fold the twisted ends down towards the bottom curve of the pretzel’s thicker middle section and press them firmly into the dough. This secures the shape and prevents it from unraveling during baking.
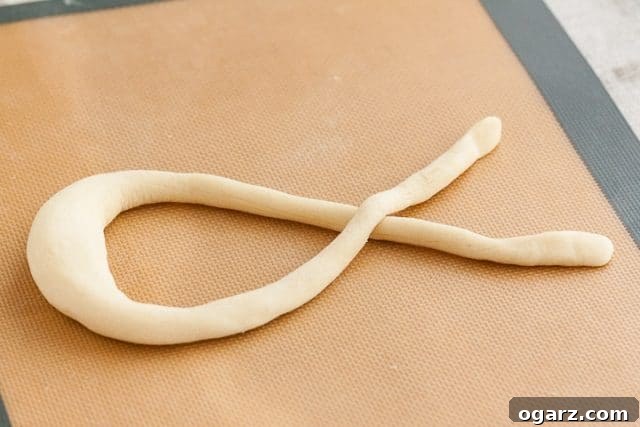
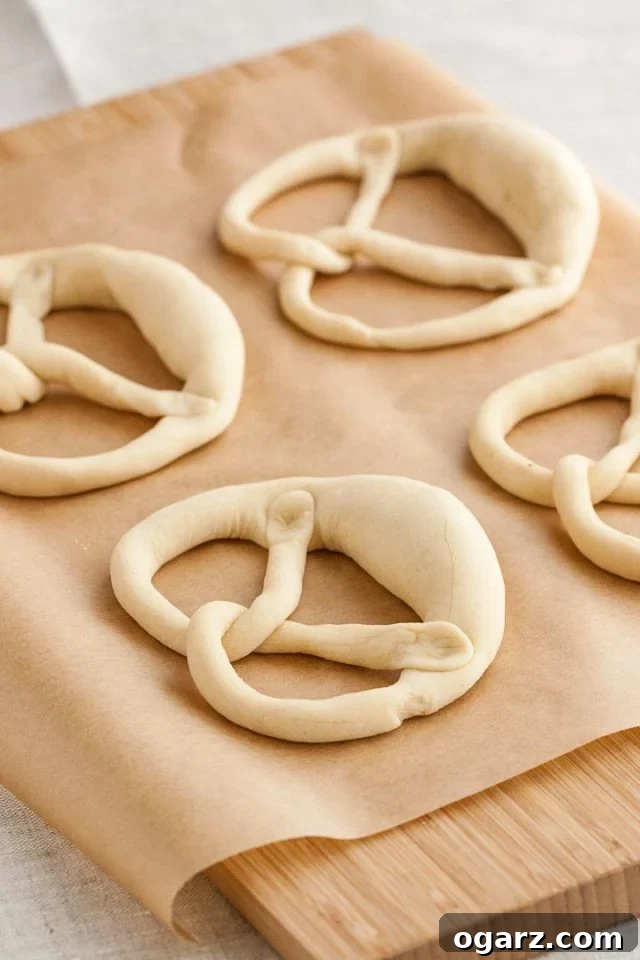
Don’t be afraid to readjust the shape slightly after the initial twist and fold to ensure it looks perfectly symmetrical, like the pretzels you admire in German bakeries. Transfer each shaped pretzel to a sheet of parchment paper. Before their crucial bath, the pretzels need a second, uncovered rise for about 30 minutes in a warm place. This step is vital not only for a final proof but also for allowing the surface of the dough to dry out. A dry surface is less likely to absorb too much of the alkaline solution, leading to a superior texture and a beautiful, even browning. For an even drier surface, consider placing them near an open window or using a fan for a few minutes before the bath.
The Secret to Golden Brown Pretzels: Lye vs. Baking Soda Bath
The distinctive deep brown color and slightly bitter, malty flavor of Bavarian pretzels are a result of a brief bath in an alkaline solution. Traditionally, bakeries use food-grade lye (sodium hydroxide) for its unmatched ability to create a dark, shiny, and uniquely flavored crust. However, working with lye at home requires extreme caution, including gloves, protective eyewear, and careful handling, as it can be corrosive to skin and eyes. For home bakers, a much safer and highly effective alternative is a baking soda bath.
While a baking soda solution may not produce the exact same intensity of color or shine as lye, it delivers results that are remarkably close and, in our opinion, just as delicious, without the associated risks. Our recipe specifically incorporates milk into the dough, which further aids in achieving a beautiful, rich brown surface during baking, compensating for any subtle differences from a lye bath. This combination ensures your homemade pretzels will boast that special texture and authentic flavor profile characteristic of traditional Bavarian pretzels.
To prepare the bath, bring a pot of water to a boil and then carefully stir in the baking soda. The water will foam up, so use a deep pot. Gently immerse each shaped pretzel into the simmering solution, one at a time, for only about 5 seconds per side. Using a slotted spoon, carefully remove the pretzel and place it back on the parchment paper. This quick dip gelatinizes the starch on the surface of the dough, which then caramelizes beautifully in the oven, giving the pretzels their signature crust.
Immediately after the bath, sprinkle your pretzels with coarse salt. While traditional, the amount of salt is entirely up to your preference; feel free to adjust or even omit it if you prefer. Before transferring them to the oven, an important final touch is to make a shallow slash with a sharp knife across the chunky middle part of each pretzel. This not only gives them that quintessential Bavarian pretzel look but also allows for steam to escape, contributing to a perfect rise and crispy crust.

Serving Suggestions: The Best Ways to Enjoy Your German Pretzels
Bavarian pretzels are incredibly versatile and can be enjoyed in a multitude of ways, reflecting both traditional German customs and popular international pairings. In Germany, a fresh pretzel is often savored as a quick, satisfying snack on its own, readily available in bakeries, train stations, and even roadside service areas. For a truly authentic German experience, try a “Butterbrezn” – a pretzel sliced horizontally and generously spread with a thick layer of fresh butter, often topped with finely chopped chives. This simple combination is surprisingly delightful and a must-try.
Another beloved Bavarian tradition is the “Weißwurstfrühstück” (white sausage breakfast), particularly famous in Munich. This hearty breakfast features delicate white sausages, traditionally eaten before noon, served alongside pretzels and a sweet, coarse mustard. It might sound unusual, but the blend of flavors is a true culinary delight. Beyond these classics, pretzels are also fantastic dipped in warm cheese sauce, a popular American-style accompaniment, or with various mustards. Even day-old pretzels find new life as ingredients in comforting German dishes like pretzel soup or pretzel dumplings, showcasing their adaptability in the kitchen.
Essential Tools and Ingredients for Pretzel Perfection
To ensure your homemade Bavarian pretzels turn out perfectly, having the right tools and understanding your ingredients is key. Beyond basic baking equipment, here are a few specifics:
- Stand Mixer with Dough Hook: While not strictly essential (you can knead by hand), a stand mixer significantly simplifies the dough-making process, ensuring a consistently smooth and elastic dough.
- Parchment Paper: Crucial for preventing sticking and easy transfer of the delicate shaped pretzels, especially after their bath.
- Slotted Spoon or Spider Skimmer: Ideal for carefully dipping and retrieving the pretzels from the hot alkaline bath.
- Coarse Salt: For that classic pretzel topping. Consider options like pretzel salt, rock salt, or coarse sea salt.
- Malt Extract: Adds a subtle sweetness and depth of flavor to the pretzel dough, enhancing the browning process. If unavailable, brown sugar can be used as a good substitute.
- Baking Soda (Sodium Bicarbonate): The safer, home-friendly alternative to lye for creating the desired deep brown crust. Ensure you’re using food-grade baking soda.
- Food-Grade Lye (Sodium Hydroxide): For those seeking the absolute traditional method, food-grade lye can be purchased. However, extreme caution, including wearing gloves and protective goggles, is paramount due to its corrosive nature. It is strongly recommended for experienced bakers only who understand and adhere to strict safety protocols. For most home bakers, baking soda offers excellent results without the risk.
Authentic Bavarian Pretzel Recipe
This recipe yields 8 delicious Bavarian pretzels, perfect for sharing or enjoying throughout the week. Prep time is about 2 hours (including rising time), and cook time is approximately 20 minutes.
Ingredients:
For the Pretzels:
- 3/4 cup milk, lukewarm
- 1/2 cup water, lukewarm
- 1 1/2 tsp brown sugar, or malt extract
- 2 1/2 tsp instant yeast, or active dry yeast
- 3 Tbsp unsalted butter, melted
- 4 cups all-purpose flour
- 2 tsp table salt
For the Bath:
- 4 cups water
- 3 Tbsp baking soda
Topping:
- 2 Tbsp coarse salt
Instructions:
- In the bowl of a stand mixer fitted with the dough hook attachment, combine lukewarm milk, water, and brown sugar (or malt extract). Stir with a fork, then sprinkle instant yeast (or active dry yeast) on top. Give it a swirl and let it sit for about 5 minutes until foamy, indicating the yeast is active.
- In the meantime, melt the butter over low heat, then set aside to cool for a few minutes.
- Add the flour, cooled melted butter, and table salt to the bowl with the yeast mixture. Knead for 5 minutes on medium-low speed until the dough is smooth and elastic.
- Cover the bowl with plastic wrap and place it in a warm spot. Let the dough rise until it has doubled in size, which typically takes about 1 hour.
- Once risen, gently punch down the dough to release the air. Divide the dough into 8 equally sized pieces.
- Take each piece of dough and roll it into a 16-inch (40 cm) long rope. Ensure the middle section (about 2 inches or 5 cm) bulges to a diameter of approximately 1.2 inches (3 cm), while the ends are thinned out to about 0.3 inches (0.75 cm).
- Bring the two thin ends of the dough together to form a circle. Twist the ends together twice, then fold them down onto the bottom curve of the pretzel’s thick middle part. Press the ends firmly into the dough to secure the classic pretzel shape.
- Transfer the shaped pretzels to a sheet of parchment paper. Let the pretzels rise uncovered for 30 minutes in a warm place. This step is crucial for developing the surface skin.
- In the meantime, preheat your oven to 390°F (200°C) with a baking sheet inside, positioned on the lower third rack.
- After the pretzels have risen, place them near an open window or use a fan for a few minutes to allow the surface to dry out further and develop a thin skin. This is important for the final texture.
- Prepare the alkaline bath: Bring 4 cups of water to a boil in a medium pot. Carefully add the baking soda to the boiling water (it will foam up).
- Using a slotted spoon, carefully dip each pretzel one at a time into the simmering baking soda solution. Immerse each pretzel for about 5 seconds per side.
- Remove the pretzels from the bath and place them back on the parchment paper.
- Immediately sprinkle with a little coarse salt. With a sharp knife, make a shallow cut (about 0.2 inches deep) in the thick middle part at the top-back of each pretzel.
- Carefully transfer the parchment paper with the pretzels onto the hot baking sheet in the preheated oven. Bake for 18-20 minutes, or until they achieve a deep, rich brown color. You want them to be nicely browned, not just golden.
- Remove the pretzels from the oven and let them cool on a wire rack. For an extra shine, you may brush them with a small amount of melted butter while they are still warm.
Notes:
Recipe updated 05/19/2020 (Amount of milk increased after reader feedback for improved texture and browning).
Nutrition (per serving, estimated):
- Calories: 225 kcal
- Carbohydrates: 39g
- Protein: 5g
- Fat: 4g
- Saturated Fat: 2g
- Cholesterol: 10mg
- Sodium: 2888mg
- Potassium: 79mg
- Fiber: 1g
- Sugar: 1g
- Vitamin A: 125 IU
- Calcium: 25mg
- Iron: 2.3mg
Frequently Asked Questions about Bavarian Pretzels
- Can I use active dry yeast instead of instant yeast?
- Yes, you can! If using active dry yeast, make sure to proof it first. Combine it with the lukewarm milk, water, and sugar, stir, and let it sit for 5-10 minutes until foamy before adding the rest of the ingredients. The quantities in the recipe are for instant yeast, so active dry might require a slightly longer proofing time for the dough.
- Why is the drying step before the bath important?
- Allowing the pretzel surface to dry out before the baking soda bath creates a “skin” on the dough. This skin helps the pretzel maintain its shape during the bath and baking, and prevents it from soaking up too much of the alkaline solution, which could lead to a less desirable texture. It contributes to the crisp, shiny crust.
- My pretzels aren’t getting dark enough, what am I doing wrong?
- Several factors can affect browning. Ensure your oven is accurately preheated to the specified temperature (an oven thermometer can help). Make sure the pretzels are dipped in the baking soda bath for the full 5 seconds per side. Also, the milk in the dough aids browning, so ensure you’re using the correct amount. Finally, resist the urge to pull them out early; they need to bake until a deep, rich brown, not just golden.
- How should I store leftover pretzels?
- Fresh pretzels are always best. To store, place cooled pretzels in an airtight container or bag at room temperature for 1-2 days. For longer storage, freeze them for up to a month. To reheat, thaw if frozen, then warm in a preheated oven at 350°F (175°C) for a few minutes until refreshed.
Discover More German Culinary Delights
If you’ve enjoyed making these authentic Bavarian pretzels, you’ll love exploring more of Germany’s rich culinary traditions. Pair your pretzels with these delicious recipes or delve into other German classics:
- German Cucumber Salad Recipe
- Bavarian Beer Cheese Spread (Obatzda) – Tastes especially great with pretzels!
- Easy German Spaetzle Recipe
- Authentic German Potato Salad
- German Apple Cake (Versunkener Apfelkuchen)
- Kaiserschmarrn

WANT TO TRY THIS BAVARIAN PRETZEL RECIPE?
PIN IT TO YOUR BAKING BOARD TO SAVE IT OR SHARE ON FACEBOOK!
Follow Plated Cravings on Pinterest for more delicious recipes!
NEVER MISS A RECIPE!
PINTEREST / FACEBOOK / INSTAGRAM / TWITTER
If you’ve tried this or any other of my recipes, don’t forget to rate the recipe and to leave me a comment. I love hearing from you!