

Welcome to the enchanting world of thumbprint cookies, a beloved classic that brings warmth and sweetness to any holiday gathering! These delightful treats, with their tender, buttery texture and sweet, colorful centers, are the epitome of festive baking. Often hailed as the perfect Christmas cookie, they boast a rich heritage, particularly celebrated in Germany for their comforting flavor and simple charm. Made with a wholesome dough enriched with ground nuts, they are traditionally filled with vibrant jams, creamy Nutella, or tangy lemon curd, offering endless possibilities for customization.
There’s something uniquely special about thumbprint cookies that sets them apart. While we adore other festive creations like crunchy Cornflake Cookies and elegant Zimtsterne, this recipe truly shines with its effortless preparation and remarkable adaptability. You don’t need fancy cookie cutters or intricate decorating skills to achieve a stunning and delicious result. Their inherent simplicity makes them an ideal baking project for families, allowing even the youngest chefs to get involved in pressing their “thumbprints” into the soft dough and choosing their favorite fillings.

The Allure of Thumbprint Cookies: A Holiday Baking Favorite
Imagine a cookie that melts in your mouth, its delicate crumb giving way to a burst of sweet, flavorful filling. That’s the magic of thumbprint cookies. These treats are an absolute joy to bake during the holidays, filling your home with an irresistible aroma. They share a kinship with more elaborate creations like Linzer Cookies, but with a significant advantage: they are much simpler to make, requiring no intricate cutting or assembling. Their charm lies in their rustic elegance and the personal touch of a lovingly made “thumbprint.”
While a beloved classic in Germany, where they are affectionately known as Engelsaugen (Angel’s Eyes) or Husarenkrapfen, the origins of these delightful cookies actually trace back to Sweden. There, they are called Hallongrotta, which translates charmingly to “Raspberry Cave,” a nod to their characteristic jam-filled center. The addition of finely ground nuts, typically hazelnuts or almonds, to the dough is a hallmark of this recipe. These nuts don’t just add a subtle, earthy flavor; they are crucial in creating the cookies’ signature extra-tender, almost crumbly texture that makes them so utterly irresistible. This unique texture, combined with their humble origins and festive appeal, has cemented their place as a cherished tradition in many households.
Exploring Exquisite Fillings for Your Thumbprint Cookies
One of the most exciting aspects of baking thumbprint cookies is the incredible freedom to experiment with fillings. The versatility of these cookies allows you to tailor them to any palate or occasion, making each batch a unique culinary adventure. While you can add fillings either before or after baking, we generally recommend adding them before for most jams and spreads. This method helps the filling set beautifully as the cookies bake, ensuring it adheres better and extends the shelf life of your delectable creations. Here are some fantastic ideas to inspire your next batch:
- Lemon Curd or Lime Curd: For a bright, tangy contrast, citrus curds are divine. They are best added after the cookies have baked and cooled slightly to preserve their vibrant flavor and smooth texture.
- Dulce de Leche: A rich, caramel-like spread that offers a luxurious, sweet, and creamy center. Its thick consistency bakes wonderfully.
- Nutella or any other hazelnut spread: For chocolate lovers, a hazelnut spread is a fantastic choice. Add it before baking, and for an extra touch of elegance and crunch, place a whole hazelnut (filbert) in the middle of the filling.
- Jam: The traditional choice! Raspberry, strawberry, apricot, or cherry jams are all excellent options. Their fruity sweetness complements the buttery cookie dough perfectly. Choose a good quality, thicker jam for best results.
- Melted Chocolate: Dark, milk, or white chocolate can create a decadent filling. Melt the chocolate gently and add it after the cookies have completely cooled for a glossy finish and rich flavor. You can even drizzle a contrasting chocolate on top for decoration.
Don’t limit yourself to just these ideas! Think about other possibilities like Biscoff spread, peanut butter, or even a homemade caramel sauce. The key is to select a filling that holds its shape reasonably well during baking if adding beforehand, or one that sets beautifully upon cooling if added post-bake.
Crafting Perfection: How to Make Irresistible Thumbprint Cookies
Creating these exquisite cookies is a straightforward process that yields incredibly rewarding results. Follow these detailed steps to bake a batch of homemade thumbprint cookies that will impress everyone.
Essential Ingredients for Perfect Thumbprints
Each ingredient plays a crucial role in achieving the signature taste and texture of these cookies:
- Granulated sugar: Provides sweetness and contributes to the cookie’s delicate crumb.
- Unsalted butter: The foundation of a rich, tender cookie. Using unsalted butter allows you to control the overall salt content of the recipe. Ensure it’s softened to room temperature for optimal creaming.
- All-purpose flour: Gives the cookies their structure. It’s important to use all-purpose flour (also known as plain flour in the UK) and avoid self-rising flour, as the latter contains leavening agents that are not needed here and could alter the cookie’s texture.
- Salt: A pinch of salt is vital. It enhances the sweetness of the sugar and balances the overall flavor, preventing the cookies from tasting flat.
- Vanilla extract: Adds a warm, aromatic depth that complements both the buttery dough and the chosen filling. Use good quality pure vanilla extract for the best flavor.
- Egg yolks: These are the secret to the cookies’ rich flavor, beautiful golden color, and wonderfully tender, melt-in-your-mouth texture. (TIP: Don’t discard the egg whites! They can be used to make delicate Meringue Cookies or other treats.)
- Ground hazelnuts (filberts): These nuts bind the dough and infuse it with a distinctive nutty flavor and a lovely tender crumb. If hazelnuts aren’t available or preferred, you can easily substitute them with an equal amount of ground almonds (blanched or unblanched), pecans, or walnuts.
- Jam: Or any of the other delicious fillings mentioned above. The choice of filling truly defines the cookie’s character.
Step-by-Step Baking Instructions
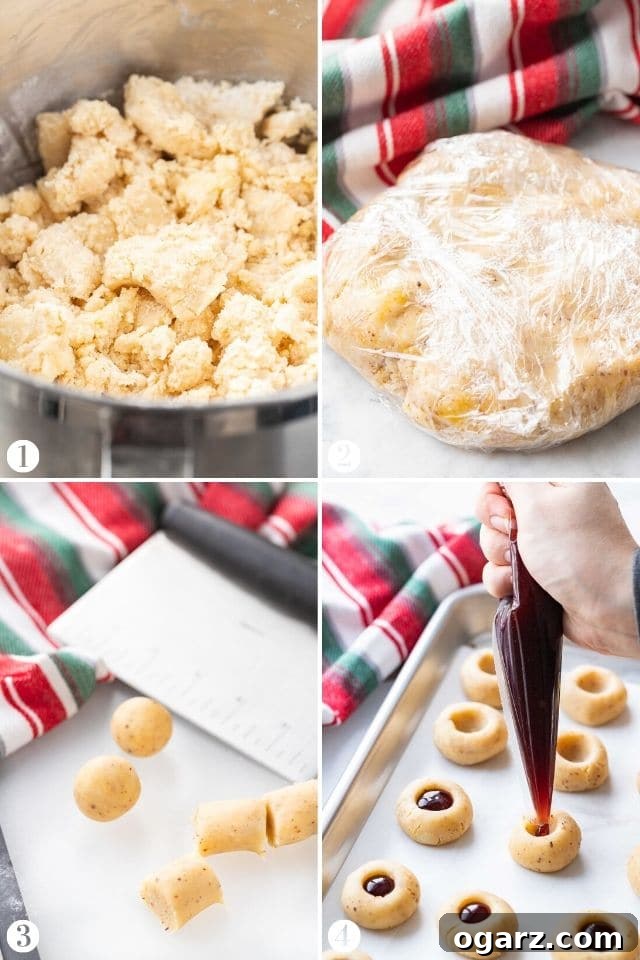
- Prepare the Dough: In the bowl of a stand mixer fitted with the paddle attachment (or using a hand mixer), cream together the softened unsalted butter and granulated sugar until light and fluffy. This step is crucial for incorporating air and creating a tender cookie. Then, add the all-purpose flour, salt, vanilla extract, egg yolks, and ground hazelnuts. Mix on low speed until the ingredients are just combined and a crumbly dough forms. Be careful not to overmix, as this can lead to tough cookies. Once mixed, gather the dough, wrap it tightly in plastic wrap, and chill it in the refrigerator for at least one hour. Chilling is essential to prevent the cookies from spreading too much during baking and makes the dough easier to handle.
- Form and Indent: Line a baking sheet with parchment paper. Take the chilled dough out of the fridge. If it’s too firm, let it sit at room temperature for a few minutes, then knead it briefly by hand to make it more pliable. Roll the dough into a log with approximately a 3/4-inch diameter. Cut 3/4-inch pieces from the log and gently roll each piece into a smooth ball. Place the balls onto the prepared baking sheet, spacing them about an inch apart. Using your little finger, the back of a small measuring spoon, or the end of a wooden cooking spoon, carefully make a distinct dent in the center of each cookie ball. Ensure the dent is deep enough to hold the filling without overflowing, but not so deep that it creates a hole through the bottom.
- Fill the Cookies: If using jam, whisk it gently until it’s smooth and free of large lumps. For a neater and easier application, transfer the jam into a pastry bag with a small round tip (or a Ziploc bag with a corner snipped off). Carefully pipe or spoon your chosen filling into each dent, being mindful not to overfill them. Just enough filling to nestle snugly in the “thumbprint” is perfect.
- Chill and Preheat: Once filled, place the baking sheet with the cookies back into the refrigerator for another 30 minutes. This second chilling step helps the cookies maintain their shape and prevents the filling from bubbling out during baking. While the cookies are chilling, preheat your oven to 350°F (177°C).
- Bake to Golden Perfection: Bake the cookies for 12-15 minutes, or until the edges are lightly golden and the filling is set. Baking time may vary depending on your oven, so keep an eye on them.
- Cool and Store: Carefully transfer the baked cookies from the baking sheet to a wire cooling rack and let them cool completely. This allows the cookies to firm up and the filling to fully set. Once cooled, transfer them to airtight cookie tins or containers. Store them in a cool, dry place to maintain their freshness.
Recipe FAQ: Your Thumbprint Cookie Questions Answered
Making cookies is an art, and sometimes questions pop up along the way. Here are some common queries and their answers to help you achieve perfect thumbprint cookies every time:
Can I refrigerate the dough and bake the cookies later? Absolutely! This is one of the conveniences of this recipe. You can refrigerate the prepared dough for up to 3 days. When you’re ready to bake, remove the dough from the fridge and let it sit at room temperature for about 20 minutes to soften slightly before proceeding with shaping and baking. This makes the dough more pliable and easier to work with.
Do I have to use hazelnuts (filberts)? Not at all! While ground hazelnuts offer a classic flavor, this recipe is flexible. You can use the same amount of ground almonds (either blanched or unblanched for a slightly different texture), walnuts, or pecans. Each nut will lend a unique, delicious flavor to the cookie, so feel free to experiment with your favorite.
Why are my Thumbprint cookies cracking? Cracking can happen for a few reasons. Often, it’s because the dough is too cold and therefore less elastic when you try to form the balls or make the dents. To prevent this, allow your chilled dough to warm up slightly at room temperature, then knead the dough balls gently in your hands for a moment before making the indentations. This little bit of warmth and kneading makes the dough more elastic and less prone to cracking.
When is the best time to add the jam to the cookies? Before or after baking? Both methods have their merits, and the best choice often depends on the type of filling. For most jams and fruit-based fillings, we prefer to add the jam before baking. As the cookies bake, the jam slightly cooks down and then sets as it cools, creating a more stable and longer-lasting cookie. This method also helps the filling adhere better. However, for fillings like melted chocolate, delicate citrus curds, or certain fresh fruit preparations, it’s definitely best to add them after the cookies have baked and cooled to maintain their optimal texture and flavor.
Do I have to heat the jam before filling the cookies? In most cases, there’s no need to heat the jam. Simply stir it well in its jar to loosen it up. If you find your jam is particularly thick, a quick stir will usually suffice. Using a piping bag (or a sturdy plastic bag with the corner snipped) makes filling the dents much easier and neater without needing to heat the jam.

Storing Your Thumbprint Cookie Delights for Lasting Freshness
To keep your thumbprint cookies fresh and delicious for as long as possible, proper storage is key. Once completely cooled, store them in metal tins or airtight containers. For optimal freshness and to prevent them from sticking together, layer the cookies with parchment paper or wax paper between each row. These cookies are remarkably resilient and do not require refrigeration; they will happily stay fresh for up to 3 weeks when stored in a cool, dry place away from direct sunlight and humidity. Their tender texture and flavorful fillings are best enjoyed at room temperature.
Can You Freeze Thumbprint Cookies?
While thumbprint cookies are fantastic for making ahead, freezing them requires a little nuance. Generally, baked thumbprint cookies with jam or other moist fillings do not freeze exceptionally well. The moisture from the filling can cause the cookies to become soggy or affect their delicate texture upon thawing. However, the good news is that you can absolutely freeze the raw cookie dough!
To freeze the dough, wrap it tightly in plastic foil (or form it into a log and then wrap) and place it in an airtight freezer-safe bag or container. Frozen dough can be stored for up to 3 months. When you’re ready to bake, transfer the frozen dough to the refrigerator and let it defrost overnight. Once thawed, you can proceed with the recipe as usual, rolling the dough into balls, making the dents, filling, and baking. This makes thumbprint cookies a perfect make-ahead option for busy holiday seasons or unexpected cravings!

Thumbprint Cookies
Ingredients
- 1/2 cup granulated sugar
- 3/4 cup unsalted butter
- 2 1/3 cups all-purpose flour
- 1/4 tsp salt
- 1 tsp vanilla extract
- 2 egg yolks
- 1/2 cup ground hazelnuts, or almonds
- 1/3 cup jam, or Nutella
Instructions
-
In the bowl of a stand mixer fitted with the paddle attachment, combine butter and sugar. Add flour, salt, vanilla extract, egg yolks, and ground hazelnuts and mix until combined. Wrap dough in plastic wrap and chill in the fridge for at least an hour.
-
Cover a baking sheet with parchment paper. Take the dough out of the fridge and shortly knead by hand. Shape the dough into a roll with a 3/4-inch diameter. Cut 3/4-inch pieces of the roll and form into balls. Put balls on a baking sheet and use your little finger, the end of a cooking spoon, or another similarly shaped tool to make a dent into each ball.
-
Whisk the jam until smooth, put it into a pastry bag, and press some jam into each dent. Don’t overfill the cookies.
-
Put the baking sheet for 30 minutes in the fridge. Preheat the oven to 350F (177C).
-
Bake cookies for 12-15 minutes.
-
Transfer cookies to a cooling rack and let cool completely. Then transfer to cookie tins and store in a cool and dry place.
Nutrition
Carbohydrates: 11g |
Protein: 1g |
Fat: 5g |
Saturated Fat: 3g |
Cholesterol: 21mg |
Sodium: 18mg |
Potassium: 13mg |
Fiber: 1g |
Sugar: 4g |
Vitamin A: 133IU |
Vitamin C: 1mg |
Calcium: 6mg |
Iron: 1mg
Like this recipe? Rate and comment below!