


Mastering the Art of Baked Ham: Your Ultimate Guide to a Perfect Holiday Centerpiece
A beautifully baked ham often serves as the grand centerpiece of holiday meals and special gatherings. Its rich flavor, succulent texture, and impressive presentation make it a perennial favorite. The good news? Preparing a show-stopping ham is far less daunting than you might imagine. Most hams available today are fully cooked, meaning your primary task is simply to rewarm it to perfection and enhance its natural flavors with a delicious glaze.
This comprehensive guide will equip you with all the knowledge you need, from selecting the ideal ham to achieving a perfectly moist and tender result, and even offering creative ways to transform leftovers. We’ll walk you through understanding ham labels, choosing the right size and cut for your needs, and provide easy, step-by-step instructions for cooking and glazing. With our expert tips, you’ll be able to focus on enjoying your guests and the festive atmosphere, confident that a truly magnificent baked ham awaits at your table, promising unforgettable flavors and cherished memories.
Demystifying Ham Labels: Your Comprehensive Guide to Selecting the Perfect Ham
Navigating the grocery store aisles for ham can sometimes feel overwhelming with the array of labels and terms. Understanding what these labels mean is key to choosing the best ham for your palate, budget, and specific cooking preferences. From curing methods to USDA classifications, each term provides valuable insight into the ham’s characteristics. Here’s a clear breakdown of the most common labels you’ll encounter:
Understanding Ham Processing Terms:
- Fully Cooked: This is a crucial label for convenience and a top reason why baked ham is perfect for stress-free entertaining. The vast majority of hams sold in supermarkets have already been thoroughly cooked, regardless of their specific cut or curing method. This means they only need to be reheated to a safe internal temperature, eliminating any guesswork about doneness and simplifying your meal preparation considerably.
- Cured: The traditional method for preserving and flavoring ham. Curing involves injecting the meat with a solution containing salt, nitrates, nitrites, various seasonings, sugars, and often preservatives. This process not only significantly extends shelf life but also imbues the ham with its signature pink color, distinctive firm texture, and rich savory flavor that many associate with classic ham.
- Uncured: For those seeking a more “natural” option, uncured hams are preserved using a brine made from natural ingredients such as sea salt, celery powder, and beet juice. These natural ingredients naturally contain nitrates, which serve the same preservative function as synthetic nitrates. While still containing nitrates, they are not synthetically added, often making this a preferred choice for health-conscious consumers. Uncured hams may have a slightly different, perhaps milder, flavor profile and typically lack the vivid pink color of their synthetically cured counterparts.
- Smoked: Many hams, especially after curing, undergo a slow smoking process over various wood chips (like hickory, applewood, or cherry wood) for several days. This adds an additional layer of rich, complex smoky flavor and further contributes to both the cooking process and preservation. The type of wood used can impart subtle yet distinct differences in the ham’s overall taste profile.
- Organic or Natural: These labels typically indicate that the ham comes from pigs raised without antibiotics or added hormones, aligning with more sustainable and ethical farming practices. The “Organic” certification further implies adherence to specific feed, living condition standards, and processing guidelines, offering consumers a choice based on animal welfare and agricultural considerations.
Deciphering USDA Ham Grades:
The United States Department of Agriculture (USDA) grades ham based on two key factors: its percentage of protein by weight and the amount of water added during the curing process. These grades directly impact the ham’s texture, flavor concentration, and overall quality, helping you choose exactly what you expect:
- Ham: This designation represents the highest quality and most concentrated ham flavor. It contains a minimum of 20.5% protein and has no more than 2% added water. Expect a firm, meaty texture and an intensely savory ham flavor, making it a premium choice.
- Ham with Natural Juices: Still a high-quality option, this ham contains a minimum of 18.5% protein and no more than 8% added water. It tends to be noticeably juicier and more tender than a standard “Ham” due to the slightly higher water content, while still offering excellent, robust flavor. This is often a popular choice for its balance of moisture and taste.
- Ham, Water Added: With a minimum of 17% protein and no more than 10% added water, this ham is often a more economical choice. The additional water content can make it very moist and tender, which some prefer, but it might slightly dilute the intensity of the inherent ham flavor compared to higher grades.
- Ham and Water Product: This category has the lowest protein content (less than 17%) and contains more than 10% added water. While it can be a very budget-friendly option, consumers should be aware that its flavor and texture may be noticeably different from higher-grade hams due to the significant water content and reduced meat concentration.
By understanding these labels, you can confidently choose a ham that not only meets your taste expectations but also aligns with your dietary preferences and budget, ensuring a satisfying culinary experience.
Choosing the Right Ham Size for Your Gathering: No More Guesswork
One of the most common questions when planning a meal is how much food to prepare, and ham is no exception. The ideal size of ham depends on whether you opt for bone-in or boneless, and, most importantly, how many guests you anticipate feeding. Hams come in various sizes and weights, influenced by factors such as the pig’s breed, its age, and the specific processing method used. Here’s a general guide to help you make an informed decision:
- Whole Hams: These are substantial cuts, typically ranging from 12 to 18 pounds. A whole ham is an excellent choice for very large family gatherings, big holiday feasts, or whenever you want to ensure plenty of delicious leftovers for days to come.
- Half Hams (Butt or Shank): A more manageable size for most average-sized families and gatherings, half hams usually weigh between 5 to 10 pounds. These provide a good balance between serving a reasonable number of people and offering a manageable cooking experience.
- Spiral-Sliced Hams: Known for their exceptional convenience and ease of serving, spiral-sliced hams often fall in the 7 to 10-pound range. Their pre-sliced nature makes them ideal for hassle-free presentation.
- Boneless Hams: The most compact and often the easiest to carve, boneless hams generally range from 2 to 8 pounds. They are perfect for smaller gatherings or when you prioritize maximum yield and minimal effort in serving.
Serving Size Recommendations:
To ensure you have enough ham for everyone and perhaps some extra for creative leftover dishes, consider these guidelines:
- For Bone-In Ham: When purchasing a bone-in ham, plan on approximately 1/2 pound per guest. This generous estimate thoughtfully accounts for the weight of the bone, ensuring that each person receives a satisfying portion of meat. Additionally, this amount typically allows for some delicious leftovers, which are always a welcome bonus for sandwiches, soups, or other delightful culinary creations.
- For Boneless Ham: With no bone to account for, you can plan for a slightly smaller quantity of around 6 ounces of boneless ham per guest. This amount should provide ample, satisfying portions for everyone at your table and still leave you with some ham to put away for a delightful second meal or various inventive leftover applications.
Always consider the general appetite of your guests, whether you’re serving other substantial main courses, and if you specifically desire leftovers when making your final decision on ham size. Erring slightly on the side of generosity is often a good strategy for festive meals!
Exploring Ham Cuts: Butt, Shank, Spiral-Sliced, and Boneless Explained
Understanding the different cuts of ham can significantly impact your cooking experience, carving ease, and the final presentation and flavor of your dish. Each cut offers unique characteristics in terms of flavor, texture, and convenience. Familiarize yourself with these distinctions to choose the perfect ham for your next meal.
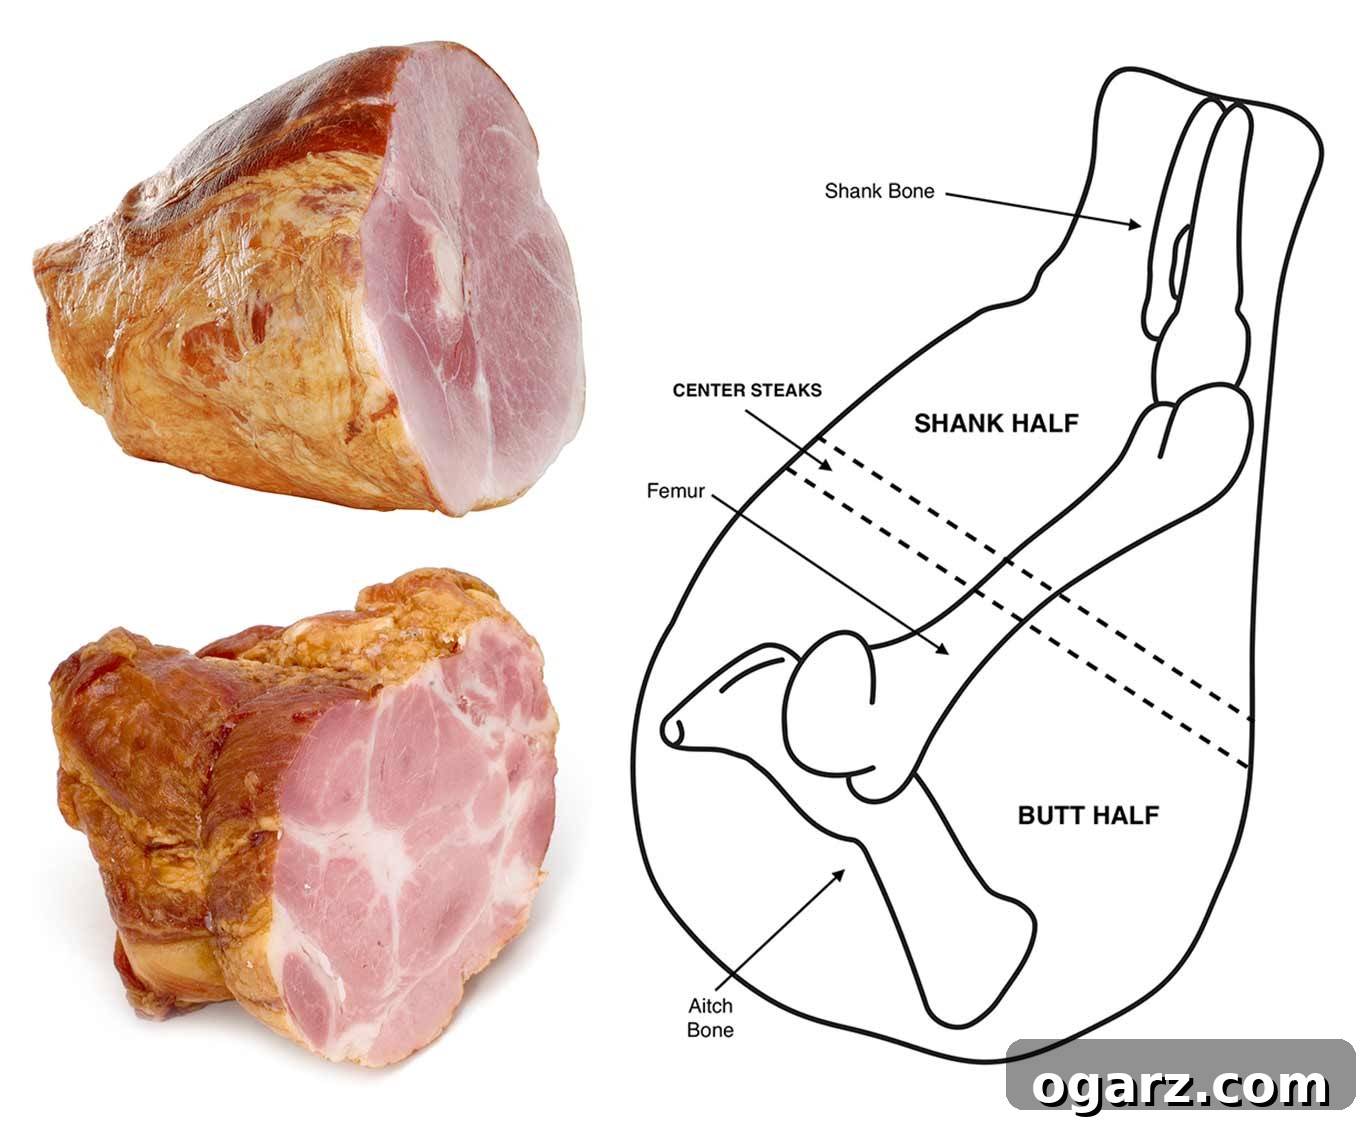
- Butt Half (Sirloin End): This cut originates from the upper portion of the hog’s hind leg, closer to the hip. The butt half is widely praised for its exceptional tenderness and rich flavor, largely due to its higher fat content and intricate muscle structure. While typically bone-in, some butt halves are labeled “semi-boneless,” indicating that the challenging-to-navigate “aitch” bone has been removed, making carving significantly easier. It’s an excellent choice for those who prioritize a robust flavor profile and a relatively straightforward carving process, offering moist, delicious slices.
- Shank Half (Leg End): Taken from the lower part of the hog’s hind leg, the shank half is easily identifiable by its more conical or funnel-like shape and a single, straight bone. It tends to be leaner and can be slightly tougher than the butt half, but it compensates with a robust, intense ham flavor. The shank’s prominent bone is also a fantastic asset for future use, perfect for making flavorful stocks or enriching pea soup. While carving can be a bit more challenging due to the bone’s shape, its strong flavor makes it a favorite for many.
- Butt or Shank Portion: If you see the term “portion” following “butt” or “shank” on the ham label, it signifies that the succulent center slices of the ham have been removed. These desirable center slices are often sold separately as convenient ham steaks. A “portion” ham is typically smaller and more economical, but be aware that you’ll miss out on the full range of flavors and textures found in a complete butt or shank half.
- Spiral-Sliced Ham: A perennial favorite for its unparalleled convenience, spiral-sliced hams are expertly cut around the bone into thin, uniform slices using a specialized machine. Crucially, the bone remains intact, holding the ham together. This preparation ensures that once heated, the ham is ready to serve with minimal additional carving – simply pull the slices apart. They are usually very moist and often come with a pre-packaged glaze, making them an ideal option for busy hosts who desire an elegant, easy-to-serve centerpiece.
- Boneless Ham: As the name unequivocally implies, boneless hams have had all bones meticulously removed. The meat is then typically pressed firmly into a uniform, compact, and incredibly easy-to-carve shape, making it the most straightforward option for serving. With many brands of boneless ham, the salt used in the curing process aids in breaking down some of the meat’s proteins, which then naturally rejoin and fill in any gaps left when the bones were extracted. However, it’s worth noting that some brands may use ground ham and/or various binders to achieve this consistent shape. If you’re concerned about additives, always make it a point to read the label carefully before choosing to ensure the product meets your specific preferences. Boneless hams are ideal for maximum yield and effortless slicing.
Each cut offers a distinct culinary experience, so consider your carving skills, desired flavor intensity, and presentation needs carefully when making your selection to ensure a truly delightful ham.
Achieving Baked Ham Perfection: A Simple Guide to Cooking and Glazing
Cooking a pre-cooked ham is primarily about rewarming it gently and thoroughly to ensure it stays wonderfully moist and flavorful, then adding a beautiful, irresistible caramelized glaze. These foundational steps apply universally, whether you’re working with a bone-in, boneless, or spiral-sliced ham. The goal is to heat it evenly without drying it out, followed by a quick blast of high heat to set the glaze. For detailed, step-by-step instructions with specific temperatures and precise timings, please refer to the complete recipe card below.
Key Steps for a Delicious Baked Ham:
- Preparation is Key: Begin by allowing your ham to come to room temperature for about an hour before baking. This crucial step promotes more even heating throughout the ham, preventing cold spots. While the ham rests, preheat your oven to the specified temperature, set up a sturdy roasting pan with a rack, and add a small amount of water (about 3/4 inch deep) to the bottom of the pan. This creates a humid environment within the oven, which is essential for keeping the ham moist and tender during the reheating process.
- Gentle Baking for Moisture: Carefully place the ham on the roasting rack, ideally with the cut side down if you’re using a half ham; this helps retain juices. Cover the entire pan completely and tightly with heavy-duty aluminum foil. This seal traps steam and moisture, ensuring the ham reheats gently and evenly. Bake at a moderate temperature (around 325°F / 160°C) for the recommended time per pound, or until the internal temperature, measured with an instant-read thermometer inserted into the thickest part (avoiding any bones), reaches a safe 140°F (60°C). While the ham bakes, take this time to whip up your chosen glaze.
- Glazing for a Golden Finish: Once the ham reaches its target internal temperature, carefully remove it from the oven and set it aside. Immediately increase the oven temperature to a higher setting (around 400°F / 200°C) to prepare for caramelization. Uncover the ham, discarding the foil. Liberally brush it with your preferred glaze (you’ll find several fantastic options and their recipes in a dedicated section below!), ensuring an even and generous coating over the entire surface. Return the glazed ham to the hotter oven for a short period, typically 10 to 15 minutes. This high-heat blast allows the glaze to bubble, thicken, and create a beautiful, glossy, caramelized crust that adds incredible flavor and visual appeal. Finally, remove the ham from the oven and, crucially, let it rest for about 15 minutes before carving. Resting allows the precious juices to redistribute evenly throughout the meat, ensuring every slice is wonderfully tender and full of flavor.
Complementing Your Ham: Delectable Side Dishes and Beverage Pairings
A perfectly baked ham, with its rich, savory, and often sweet-glazed notes, truly shines when paired with an array of thoughtfully chosen side dishes and beverages. The best accompaniments often depend on the season or the specific occasion, allowing for wonderful culinary creativity. The key is to create a harmonious balance of flavors and textures, ensuring that no element overpowers another.
Classic Side Dish Pairings:
- Potatoes: Potatoes are practically synonymous with ham dinners. Rich and creamy scalloped potatoes, with their layers of tender potato and savory cheese sauce, or smooth, buttery mashed potatoes, are quintessential partners. Their comforting nature and ability to absorb flavors complement the savory meat beautifully. Roasted potatoes with herbs are also a fantastic option.
- Spring Delights: For spring holidays like Easter or Mother’s Day, lighter, fresher vegetables truly shine. Bright green roasted asparagus with lemon butter offers a crisp and slightly zesty contrast to the richness of the ham. Other spring favorites include tender green peas with mint, or a vibrant spring salad featuring seasonal greens and delicate vinaigrette.
- Autumn and Winter Comforts: During cooler months, heartier and more robust vegetables are ideal. Consider savory roasted pearl onions, which caramelize beautifully, or tangy and slightly sweet braised red cabbage. Tender green beans with toasted walnuts and shallots offer a delightful texture and nutty flavor. Additionally, sweet potato casseroles, roasted root vegetables, or glazed carrots make excellent, warming choices.
- Breads and Rolls: Don’t forget the simple pleasure of warm dinner rolls, fluffy cornbread, or a crusty baguette. They are perfect for soaking up any delicious ham juices or the delectable glaze, adding another layer of comfort to the meal.
Dessert Recommendations:
To round off the meal, a dessert that isn’t overly heavy works wonderfully, providing a sweet finish without being overwhelming. For spring gatherings, a light and flavorful carrot bundt cake with cream cheese frosting is a delightful and seasonally appropriate choice. Other excellent options include fresh fruit tarts, a simple apple crisp or crumble with vanilla ice cream, or a classic, airy cheesecake topped with berries.
Beverage Pairings:
Choosing the right drink can significantly elevate the dining experience, harmonizing with the ham’s flavors. Ham pairs well with a surprisingly wide variety of beverages:
- Wine: A dry rosé is a fantastic and highly versatile choice, as its crisp acidity can cut through the richness of the ham without overwhelming it. Light-bodied red wines like Pinot Noir, with their subtle fruit notes and earthy undertones, also pair nicely. For white wine enthusiasts, off-dry or dry Rieslings, especially those with a hint of sweetness, offer a refreshing counterpoint to the ham’s inherent saltiness and the glaze’s sweetness, creating a beautiful balance.
- Beer: For beer connoisseurs, a light lager is a safe and incredibly refreshing bet, cleansing the palate between bites. A crisp pilsner or even a light amber ale, with its malty sweetness and subtle hop character, can also beautifully complement the flavors of the ham without being too heavy or intrusive.
- Non-Alcoholic Options: For guests who prefer non-alcoholic drinks, sparkling cider provides a festive and sweet effervescence. Unsweetened iced tea offers a classic, clean taste, while fruit-infused waters (such as cucumber-mint or lemon-berry) can provide refreshing and naturally flavored alternatives for all guests, enhancing the meal without alcohol.
Six Easy Glazes to Transform Your Baked Ham
A fantastic glaze is truly the crowning glory of any baked ham, adding a beautiful, glistening sheen, extra moisture, and an irresistible caramelized crust that locks in flavor. These six simple glaze recipes are not only incredibly delicious on ham but are also wonderfully versatile, making them suitable for oven-baked chicken, pork chops, or pork roasts. Each recipe yields approximately 1-1/4 cups of glaze and can be prepared in under 15 minutes, making them quick and convenient additions to your meal. Remember that glazes naturally thicken as they cool, so take care not to over-reduce them excessively over the heat, ensuring they remain pourable and brushable.
1. Classic Brown Sugar-Honey Glaze
This timeless glaze offers a perfect balance of sweet, savory, and a hint of tang, making it universally appealing. To prepare, melt 2 tablespoons of unsalted butter in a small saucepan over medium heat. Add 1 clove of minced garlic and cook gently until it becomes fragrant and barely golden, being very careful not to let it brown, which can make it bitter. Stir in 1 cup packed light brown sugar, 1/2 cup honey, 3 tablespoons apple cider vinegar, and 1 tablespoon Dijon mustard. Continue to cook over medium-low heat, stirring frequently, until the brown sugar has fully dissolved and the glaze becomes smooth, glossy, and beautifully syrupy.
2. Rich Cider-Bourbon Glaze
For a sophisticated depth of flavor with a warm, slightly boozy undertone, try this cider-bourbon glaze. Combine 1 cup apple cider, 1-3/4 cups light brown sugar, 3 tablespoons quality bourbon, and 1 teaspoon dry mustard powder in a small saucepan. Bring the mixture to a rapid simmer over medium heat, stirring continuously until the brown sugar completely dissolves and the mixture is uniform. Reduce the heat to low and gently simmer for 5 to 7 minutes, allowing it to slightly thicken into a fragrant, golden syrup, perfect for coating your ham.
3. Tropical Pineapple-Ginger Glaze
Add a bright, zesty, and subtly spicy kick to your ham with this vibrant tropical glaze. In a small saucepan, combine 1 cup unsweetened pineapple juice, 1-3/4 cups brown sugar, 2 teaspoons freshly grated ginger, and 1 tablespoon Dijon mustard. Bring the mixture to a rapid simmer over medium heat, stirring until the brown sugar has fully dissolved into the liquid. Reduce the heat to low and allow it to simmer gently until it reaches a beautiful syrupy consistency, typically within 5-7 minutes. This glaze offers a delightful balance of sweetness and zing.
4. Sweet and Tangy Apricot Glaze
This glaze offers a lovely balance of luscious sweetness and delightful tartness, creating a complex and appetizing flavor profile. Combine 1 cup apricot preserves, 1/3 cup fresh orange juice, 3/4 cup brown sugar, 1 tablespoon fresh lemon juice, and 1 teaspoon fresh lemon zest together in a small saucepan over medium heat. Cook the mixture, stirring frequently, until the brown sugar completely dissolves. Then, reduce the heat to low and continue to cook for an additional 6 to 8 minutes, allowing the glaze to gently thicken into a rich, appealingly syrupy consistency.
5. Decadent Cherry-Port Glaze
For a deep, sophisticated, and slightly luxurious flavor, this cherry-port glaze is an exceptional choice. Combine 1 cup cherry preserves, 1/3 cup ruby port wine, 3/4 cup brown sugar, and 1/2 teaspoon pure vanilla extract together in a small saucepan over medium heat. Stir frequently until the brown sugar fully dissolves into the mixture, creating a smooth base. Reduce the heat to low and simmer for 6 to 8 minutes, allowing the glaze to become wonderfully thick, glossy, and syrupy, concentrating its rich fruit and wine flavors.
6. Savory-Sweet Crumb Crust
While not a traditional liquid glaze, this unique coating bakes onto the ham to form an absolutely irresistible crunchy, sweet-and-savory crust. It offers a wonderful textural contrast to the tender ham. To make it, in a medium mixing bowl, stir together 3 beaten egg yolks, 2/3 cup unseasoned dry breadcrumbs, 1/3 cup whole grain mustard, 1/2 cup brown sugar, 2 teaspoons apple cider vinegar, and 1/2 teaspoon ground ginger until all ingredients are thoroughly combined and form a thick paste. When it’s time to glaze, apply this crumb mixture evenly over the surface of the ham, following the same instructions for glazing, and return it to a 400°F (200°C) oven for about 20 minutes, or until the crust is beautifully golden brown and firmly set.
Beyond the Main Course: Creative Uses for Leftover Ham
One of the many joys of cooking a large ham is the delicious bounty of leftovers! Far from being a chore, leftover ham presents a fantastic opportunity for culinary creativity, allowing you to extend the enjoyment of your festive meal. With proper storage, your leftover ham can provide several more delightful meals. Ensure it’s wrapped tightly in aluminum foil or stored in an airtight container and refrigerated for up to three days. For longer-term storage, slice or dice the ham, wrap portions well in foil, and place them in a zip-top freezer bag; it will keep beautifully in the freezer for up to three months.
Don’t let any of that flavorful ham go to waste! Diced ham, in particular, is incredibly versatile and can be used in countless delicious recipes. Here are some of our favorite ideas to inspire you and help you transform your holiday centerpiece into exciting new dishes:
- Hearty Soups and Stews: Dice leftover ham and freeze it in small, convenient batches, perfect for adding a smoky, savory depth to comforting soups and stews. It’s a fantastic and traditional addition to a classic Classic Split Pea Soup, enriching its flavor. It also works wonderfully in lentil soup, a creamy potato soup, or even a robust bean stew.
- Quick Fried Rice: Transform your leftovers into a delicious and incredibly satisfying meal in minutes. Create a quick stir-fry with leftover cooked rice, generous amounts of diced ham, scrambled egg, frozen peas, finely chopped onion, minced garlic, and fresh grated ginger. Season generously with soy sauce, a touch of hoisin sauce for sweetness, and a dash of sriracha for a flavorful kick, creating a restaurant-quality dish at home.
- Smoky Mac and Cheese: Elevate your favorite macaroni and cheese casserole to new heights by stirring in some diced ham before baking. The ham adds a wonderful protein boost and a subtle smoky depth of flavor that beautifully complements the creamy, cheesy goodness, making it an even more comforting and substantial meal.
- Satisfying Salads: Turn a simple green salad into a complete and satisfying dinner by adding a generous portion of diced ham, a sliced hard-boiled egg, cherry tomatoes, cucumber, and your favorite dressing. This makes for a quick, healthy, and incredibly flavorful meal, perfect for a lighter lunch or dinner.
- Breakfast & Brunch Delights: Warmed diced ham can be gently folded into scrambled eggs for a hearty and flavorful breakfast. Alternatively, add some along with shredded Cheddar cheese, diced bell peppers, and onions to fill a fluffy omelet or a rustic frittata. It’s also excellent in breakfast burritos, savory pancakes, or even a breakfast hash.
- Casseroles and Quiches: Ham is a natural and beloved fit for various comforting casseroles and elegant quiches. Combine it with potatoes, cheese, and your favorite vegetables for a delicious and easy baked casserole, or use it as the savory filling in a classic Quiche Lorraine or a custom vegetable quiche.
With these ideas, your delicious baked ham can continue to provide wonderful, varied meals long after the initial feast, ensuring every last bit is enjoyed.

Easy Oven Baked Glazed Ham Recipe
Prepare a deliciously moist and tender baked ham using our straightforward basic recipe. This method works perfectly for bone-in, spiral-sliced, and boneless hams and comes with six different easy-to-make ham glazes for you to choose from, ensuring a perfect finish every time for your holiday table or special gathering.
Equipment
- Roasting pan with rack
- Heavy-duty aluminum foil
- Instant-read thermometer
Ingredients
- 5 to 8 lb bone-in, spiral-sliced, or boneless ham (fully cooked)
- Water (for roasting pan)
- 1 cup ham glaze (choose from the options provided in the “Six Easy Glazes” section above)
Instructions
- Remove your ham from the refrigerator about an hour before you’re ready to cook. This crucial step allows the ham to come closer to room temperature, promoting more even heating and preventing the exterior from drying out before the interior is warmed.
- Preheat your oven to 325°F (160°C). This moderate temperature helps to gently rewarm the ham without overcooking it.
- Add about 3/4 inch of water to the bottom of your roasting pan. This creates a moist, steaming environment within the covered pan, which is essential for keeping the ham wonderfully tender and juicy throughout the reheating process.
- Position a rack securely in the roasting pan and carefully place the ham on the rack. If using a half ham, place it cut side down to help retain its juices. Cover the entire pan completely and tightly with heavy-duty aluminum foil, ensuring a tight seal around the edges to trap all the moisture.
- Bake the ham for approximately 15 to 18 minutes per pound. Continue baking until its internal temperature, measured with an instant-read thermometer inserted into the thickest part of the ham (making sure to avoid touching any bone), reaches 140°F (60°C). Note: For hams larger than 10 pounds, the cooking time per pound might be slightly longer, so always rely on the thermometer reading for accuracy.
- While the ham is in the oven, use this time to prepare your desired glaze. You can find several easy and delicious recipes outlined in the “Six Easy Glazes to Transform Your Baked Ham” section earlier in this article.
- Once the internal temperature of the ham has reached the target 140°F, carefully remove it from the oven and set it aside. Immediately increase the oven temperature to 400°F (200°C) to prepare for the glazing and caramelization step.
- Uncover the ham, carefully discarding the aluminum foil. Liberally brush the ham with your freshly prepared glaze, ensuring an even and generous coating over the entire surface. Return the glazed ham to the hotter oven for 10 to 15 minutes, or until the glaze is beautifully caramelized, glistening, and slightly sticky. Keep a close eye on it to prevent any burning.
- Remove the ham from the oven and allow it to rest undisturbed for at least 15 minutes before carving. This resting period is absolutely crucial, as it allows the internal juices to redistribute evenly throughout the meat, resulting in a significantly more tender, moist, and flavorful ham. After resting, carve and serve your magnificent creation!
Notes
For detailed recipes of the six easy glazes mentioned in step 6 of the instructions, please refer to the comprehensive “Six Easy Glazes to Transform Your Baked Ham” section earlier in this article. Each glaze recipe yields approximately 1-1/4 cups and takes less than 15 minutes to prepare. Remember that glazes will naturally thicken as they cool, so take care not to over-reduce them excessively when simmering on the stovetop.
Important Note: The nutrition information provided below is an approximation and is calculated for a 4-ounce portion of plain ham only. It does not account for any additional calories, sugars, or other nutritional content that may come from the applied glaze. Actual values may vary based on specific ham brands and glaze ingredients.
Nutrition Information
- Serving Size: 4 ounces
- Calories: 169
- Total Fat: 9g
- Cholesterol: 83mg
- Sodium: 658mg
- Protein: 21g
Nutrition information is automatically calculated and should be used as an approximation. Actual values may vary significantly based on ingredients, specific ham product, and preparation methods.