

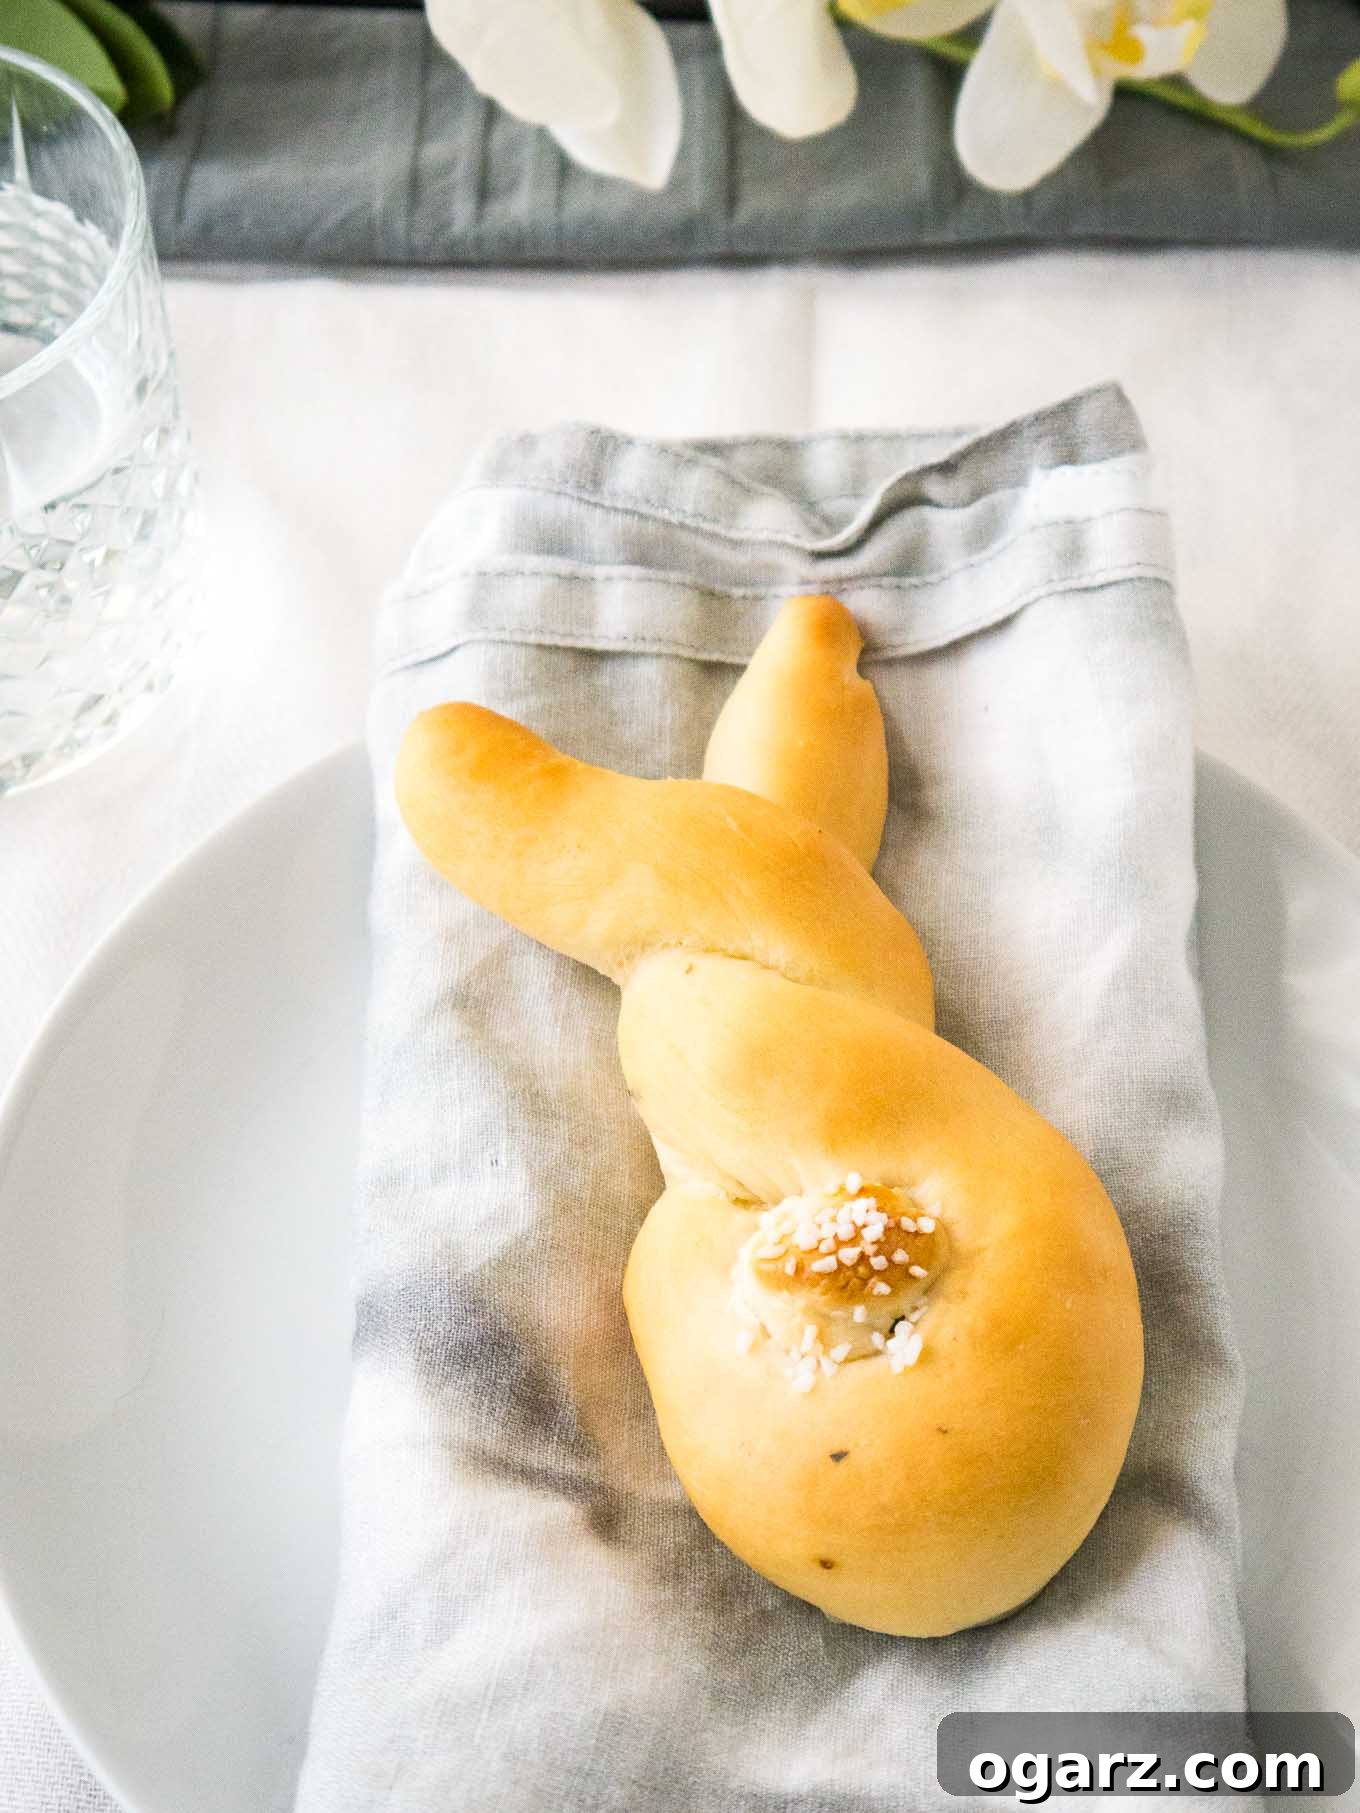
Welcome to the most enchanting way to bring joy and deliciousness to your Easter table or any spring celebration! These delightful Easter Bunny Rolls are remarkably easy to prepare and absolutely perfect for both a festive brunch or a heartwarming dinner. Crafted from a simple, fool-proof homemade yeast dough, these charming bunny-shaped rolls are wonderfully buttery, incredibly fluffy, and irresistibly cute with their distinct salty tails. Get ready to bake a batch of smiles!
Discover the Magic of Homemade Bunny Rolls
Soft, tender, and richly buttery, our Bunny Rolls offer an adorable and fun twist on conventional dinner rolls. They are designed not only to add a truly festive touch to your Easter or springtime meals but also serve as a playful and whimsical addition to any dinner table, bringing smiles year-round. Imagine the delight on your guests’ faces, especially children, when they see these charming creations!
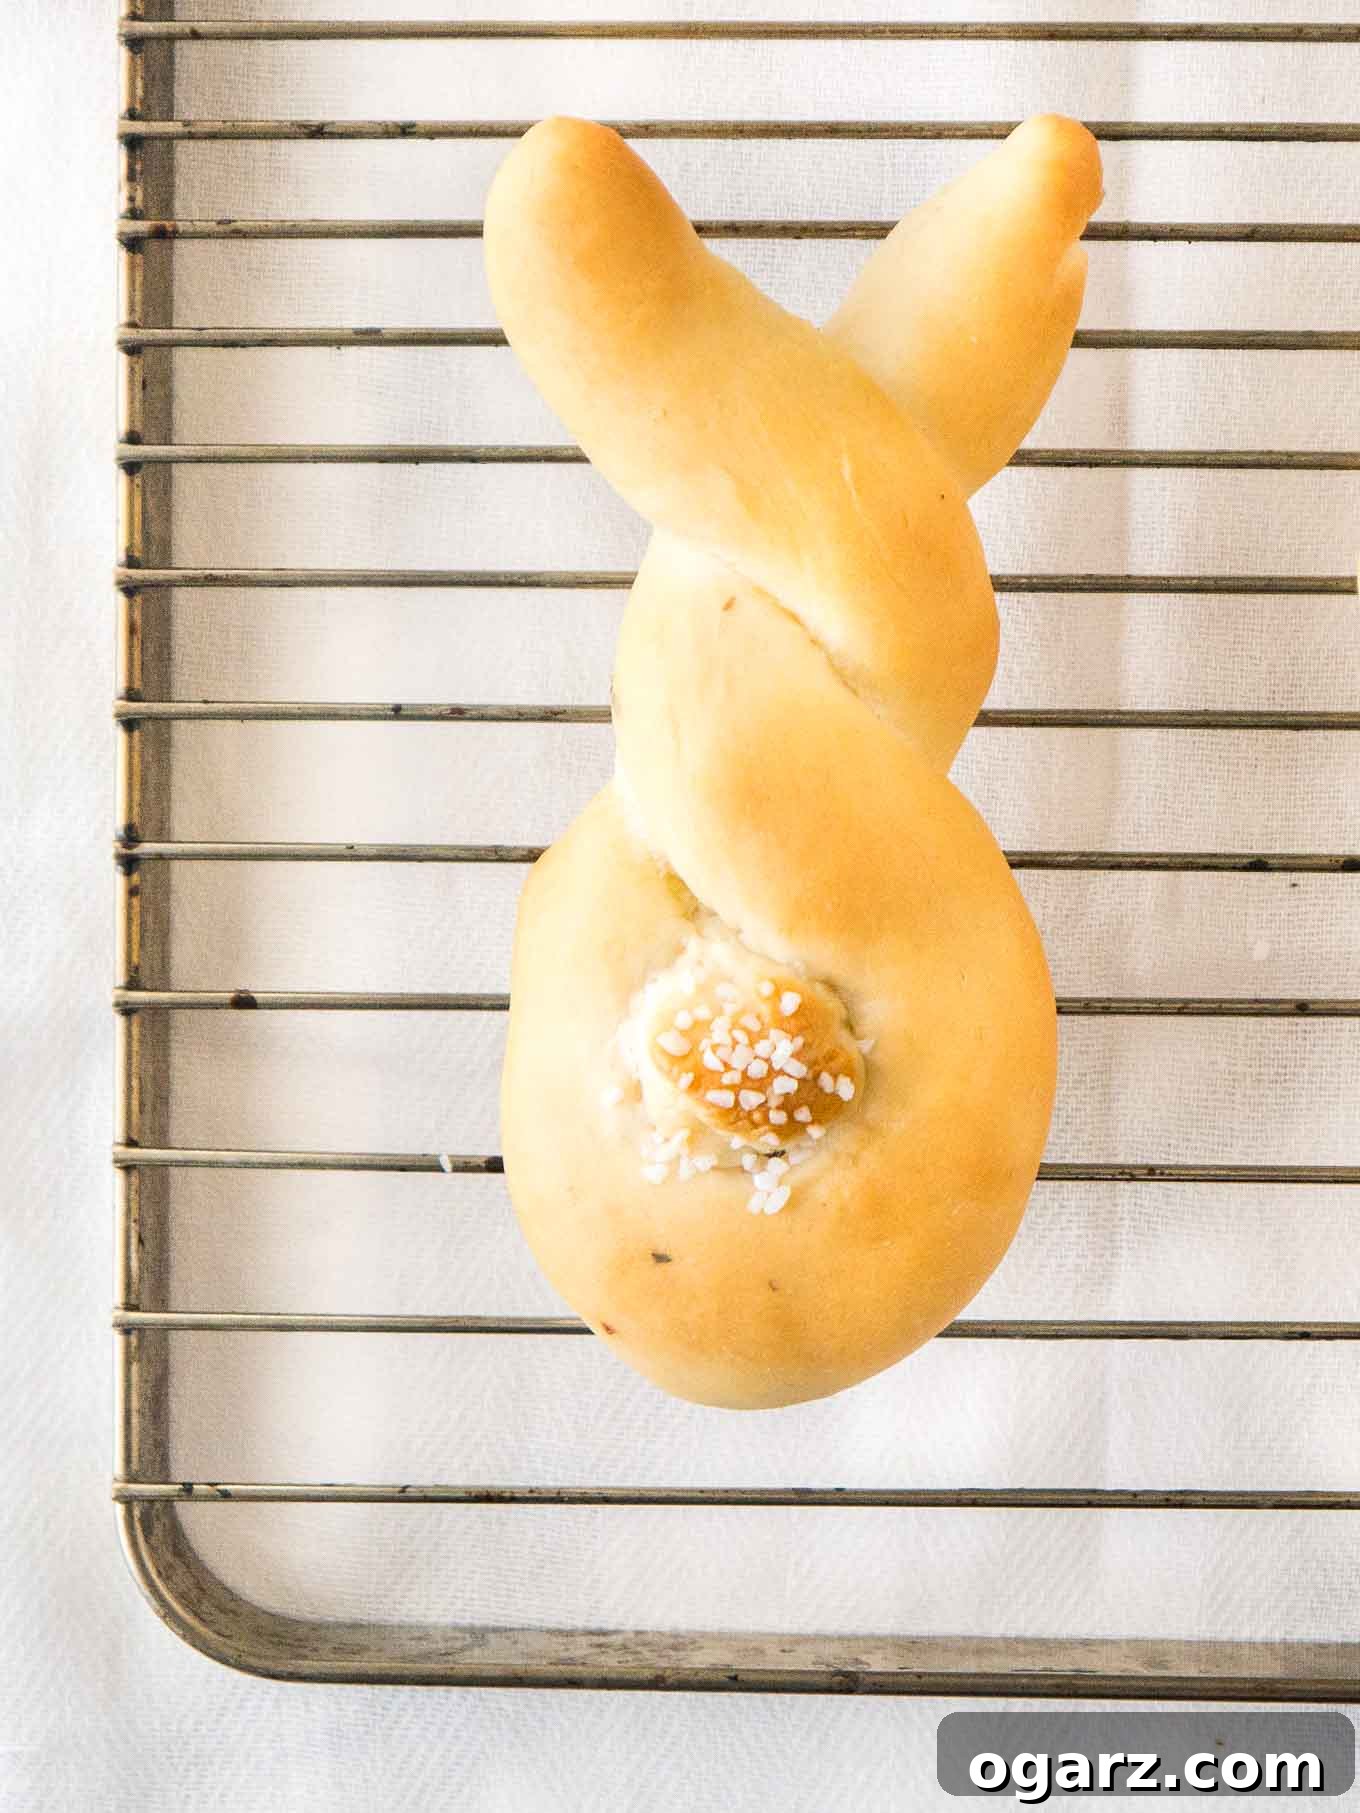
These delightful rolls are made from scratch using a simple, beginner-friendly yeast dough, much like our popular white bread recipe. This ensures a consistent, delicious result every time. Each soft and fluffy roll is carefully shaped into a cute bunny with distinct ears and a fluffy tail. Once baked to golden perfection, we recommend serving them warm with a generous slather of butter, allowing the rich flavors to melt in your mouth. They also make fantastic festive sandwiches, perfect for packing into lunchboxes or serving at a spring picnic.
Why You’ll Fall in Love with This Recipe
Preparing these Easter Bunny Rolls is more than just baking; it’s creating a memorable experience. Here’s why this recipe will quickly become a cherished favorite:
- Unforgettable Charm: Bunny-shaped dinner rolls are an instant showstopper, making a fun and incredibly cute addition to your Easter dinner, spring brunch, or any special occasion. They evoke feelings of warmth and festivity!
- Effortlessly Homemade: This recipe is super easy to make from scratch, even if you’re new to working with yeast dough. We guide you through every step, ensuring a successful and rewarding baking adventure.
- Soft, Fluffy, and Flavorful: Beyond their adorable appearance, these rolls boast an irresistible texture – pillowy soft and wonderfully fluffy – paired with a delicious, buttery taste that will have everyone reaching for more.
- Versatile Delight: While perfect for holidays, these rolls are versatile enough to be enjoyed year-round. Customize their tails with coarse sugar for a sweeter treat or keep them savory with sea salt.
- Engaging Baking Project: Shaping the bunnies is a fun activity for the whole family. It’s a wonderful way to involve children in the kitchen and create lasting memories together.
Essential Ingredients: A Closer Look
Crafting the perfect Easter Bunny Rolls begins with understanding the role of each ingredient. Below is an overview of what you’ll need and why it’s important. For precise quantities, please refer to the detailed recipe card at the bottom of the page.
- All-Purpose Flour: This is the foundation of our soft and fluffy rolls. It’s crucial to measure your flour correctly to avoid dense rolls. The best method is to spoon the flour into your measuring cup and then level it off with a knife, rather than scooping directly from the bag. While all-purpose flour works beautifully, bread flour can also be used if you have it, yielding a slightly chewier texture due to its higher protein content.
- Instant Dry Yeast: We recommend instant dry yeast for its convenience – it can be mixed directly with your dry ingredients without prior activation. This saves time and simplifies the process. If you only have active dry yeast, remember to activate it first by dissolving it in a portion of the warm water with a pinch of sugar for about 5-10 minutes until foamy.
- Warm Water: The temperature of your water is critical for activating the yeast. It should be lukewarm, ideally between 105°F and 115°F (40°C and 46°C). Water that’s too cold won’t activate the yeast, while water that’s too hot can kill it, preventing your dough from rising. Using warm water also helps the dough to rise faster and more effectively.
- Granulated Sugar: A small amount of sugar not only adds a subtle sweetness to the rolls but, more importantly, acts as food for the yeast, helping it to activate and thrive.
- Salt: Essential for flavor balance, salt also plays a role in controlling yeast activity and strengthening the gluten structure in the dough. Don’t skip it!
- Vegetable Oil: A flavor-neutral oil, such as avocado oil, vegetable oil, or canola oil, is ideal for this recipe. It contributes to the dough’s tenderness, moisture, and ensures a soft crumb in the final baked rolls.
- Egg (for egg wash): While not in the dough itself, one egg is used for the egg wash. Brushing the rolls with an egg wash before baking gives them a beautiful golden-brown color and a lovely sheen. It also helps the coarse salt (or sugar) for the tails to adhere perfectly.
- Coarse Sea Salt (for tails): This adds a delightful touch of savory contrast to the buttery rolls. For those who prefer a sweeter treat, coarse sugar can be used as a delicious alternative for the bunny tails.
- Unsalted Butter (melted, for brushing): Brushing the warm, freshly baked bunnies with melted unsalted butter adds an extra layer of richness, flavor, and a gorgeous glossy finish, making them even more irresistible.
Crafting Your Bunny Rolls: A Step-by-Step Guide
Detailed measurements and instructions are conveniently provided on the printable recipe card at the bottom of this page. Here, we offer an expanded guide to ensure your baking process is smooth and enjoyable.
Phase 1: Preparing the Dough (The Foundation of Fluffy Rolls)
To begin your bunny roll adventure, you’ll need either a stand mixer fitted with a dough hook for effortless kneading, or your hands for a satisfying (and effective!) workout. The key to excellent yeast dough is proper mixing and kneading.
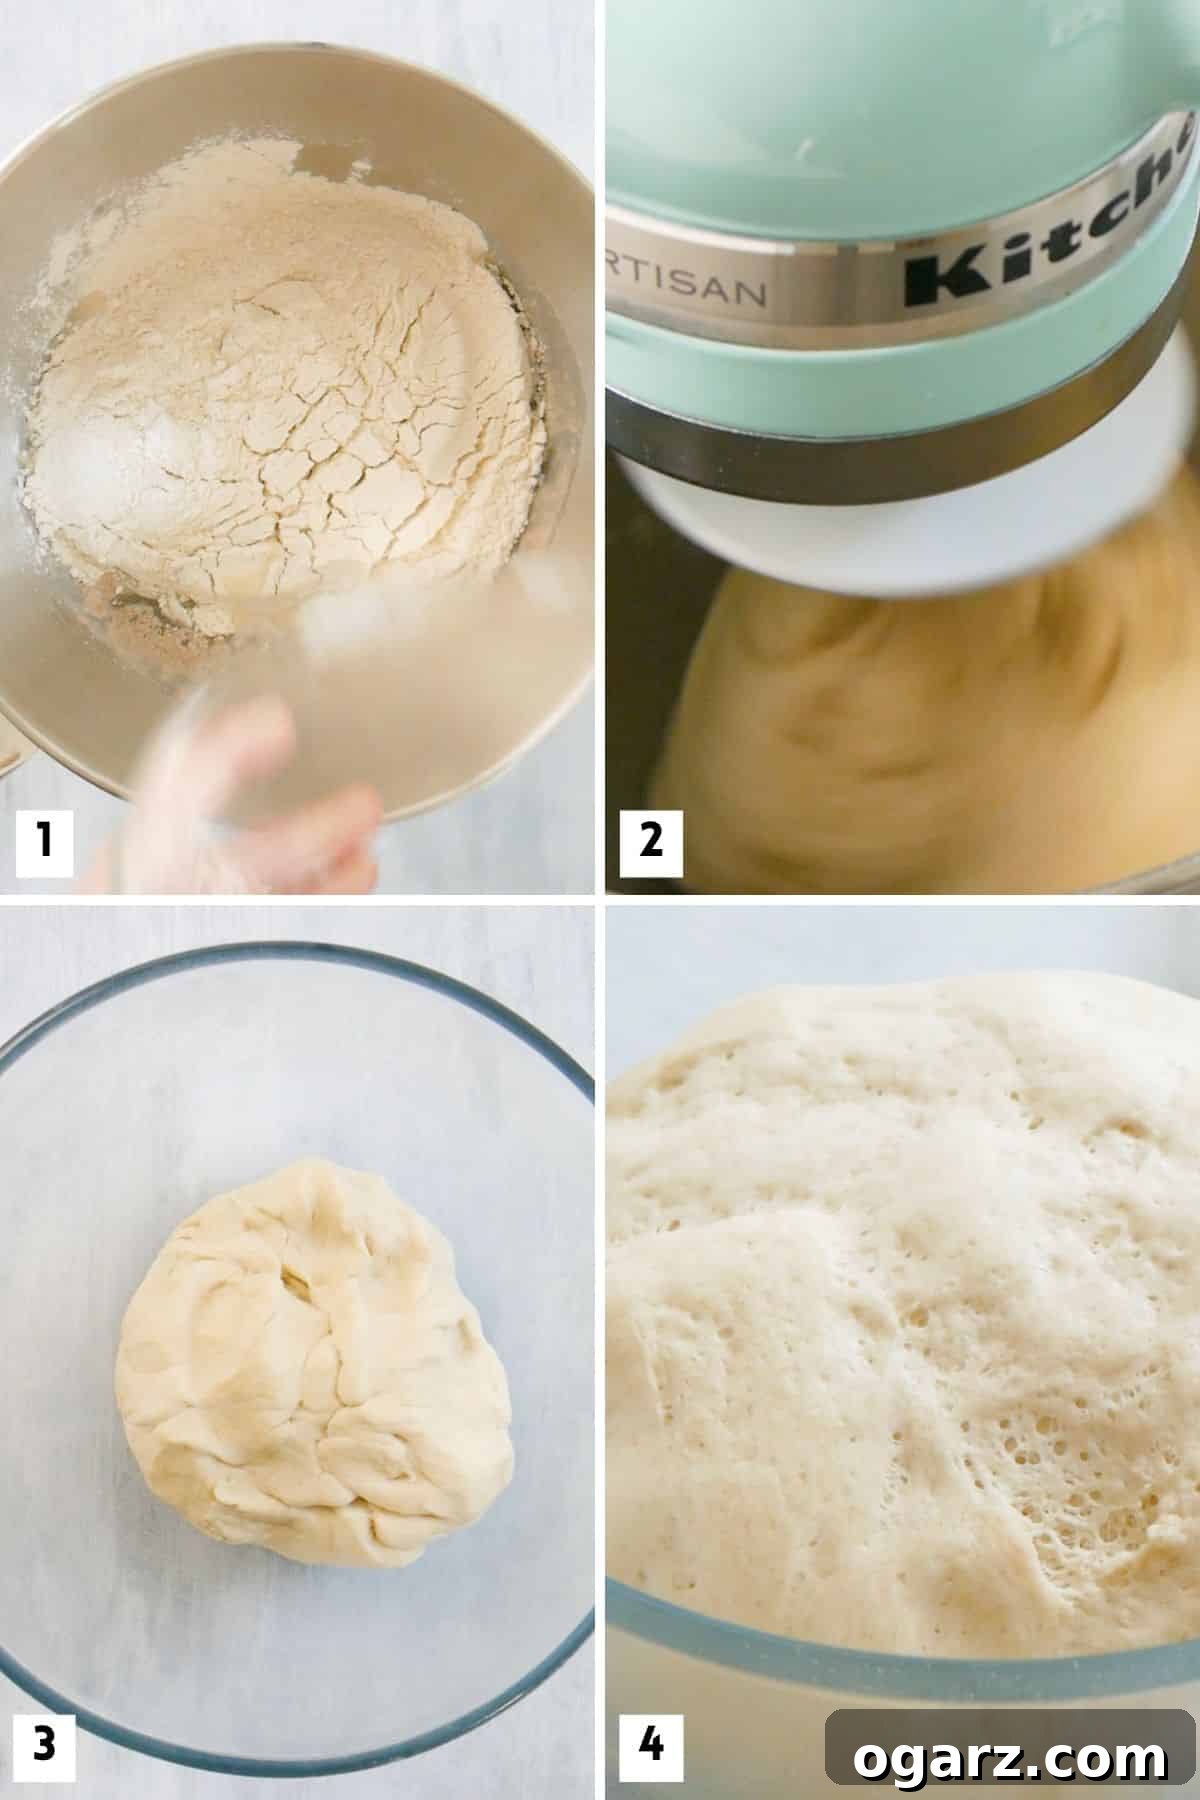
- Combine Ingredients: Start by combining the lukewarm water, instant yeast, sugar, salt, vegetable oil, and finally, the all-purpose flour in the bowl of your stand mixer. If using active dry yeast, remember to activate it first. (Refer to Image 1 in the visual guide for this initial stage).
- Knead to Perfection: Begin kneading the dough on low to medium speed. Watch as the ingredients come together, transforming into a cohesive mass. Continue kneading for approximately 4-6 minutes. The dough is ready when it pulls away cleanly from the sides of the bowl, feeling smooth, elastic, and only slightly sticky to the touch. This process develops the gluten, which is essential for that wonderfully chewy yet tender texture.
Phase 2: The Art of Rising (Patience is a Virtue)
This is where the magic happens! The yeast dough needs ample time to rise for about 1 to 2 hours, or until it has visibly doubled in size. (Images 3 and 4 in the visual guide illustrate the dough before and after its first rise). This step is truly critical; it allows the yeast to ferment, creating air pockets that result in a light and airy texture. Rushing this process can lead to dense rolls with an unpleasant yeasty flavor. Find a warm, draft-free spot in your kitchen to encourage optimal rising.
Phase 3: Shaping the Adorable Bunnies
Once your dough has risen beautifully, it’s time to bring your bunnies to life! Gently punch down the dough to release the accumulated air. Turn it out onto a lightly floured surface and divide it into six equal portions. Each portion will become one charming bunny.
The shaping process is fun and simple:
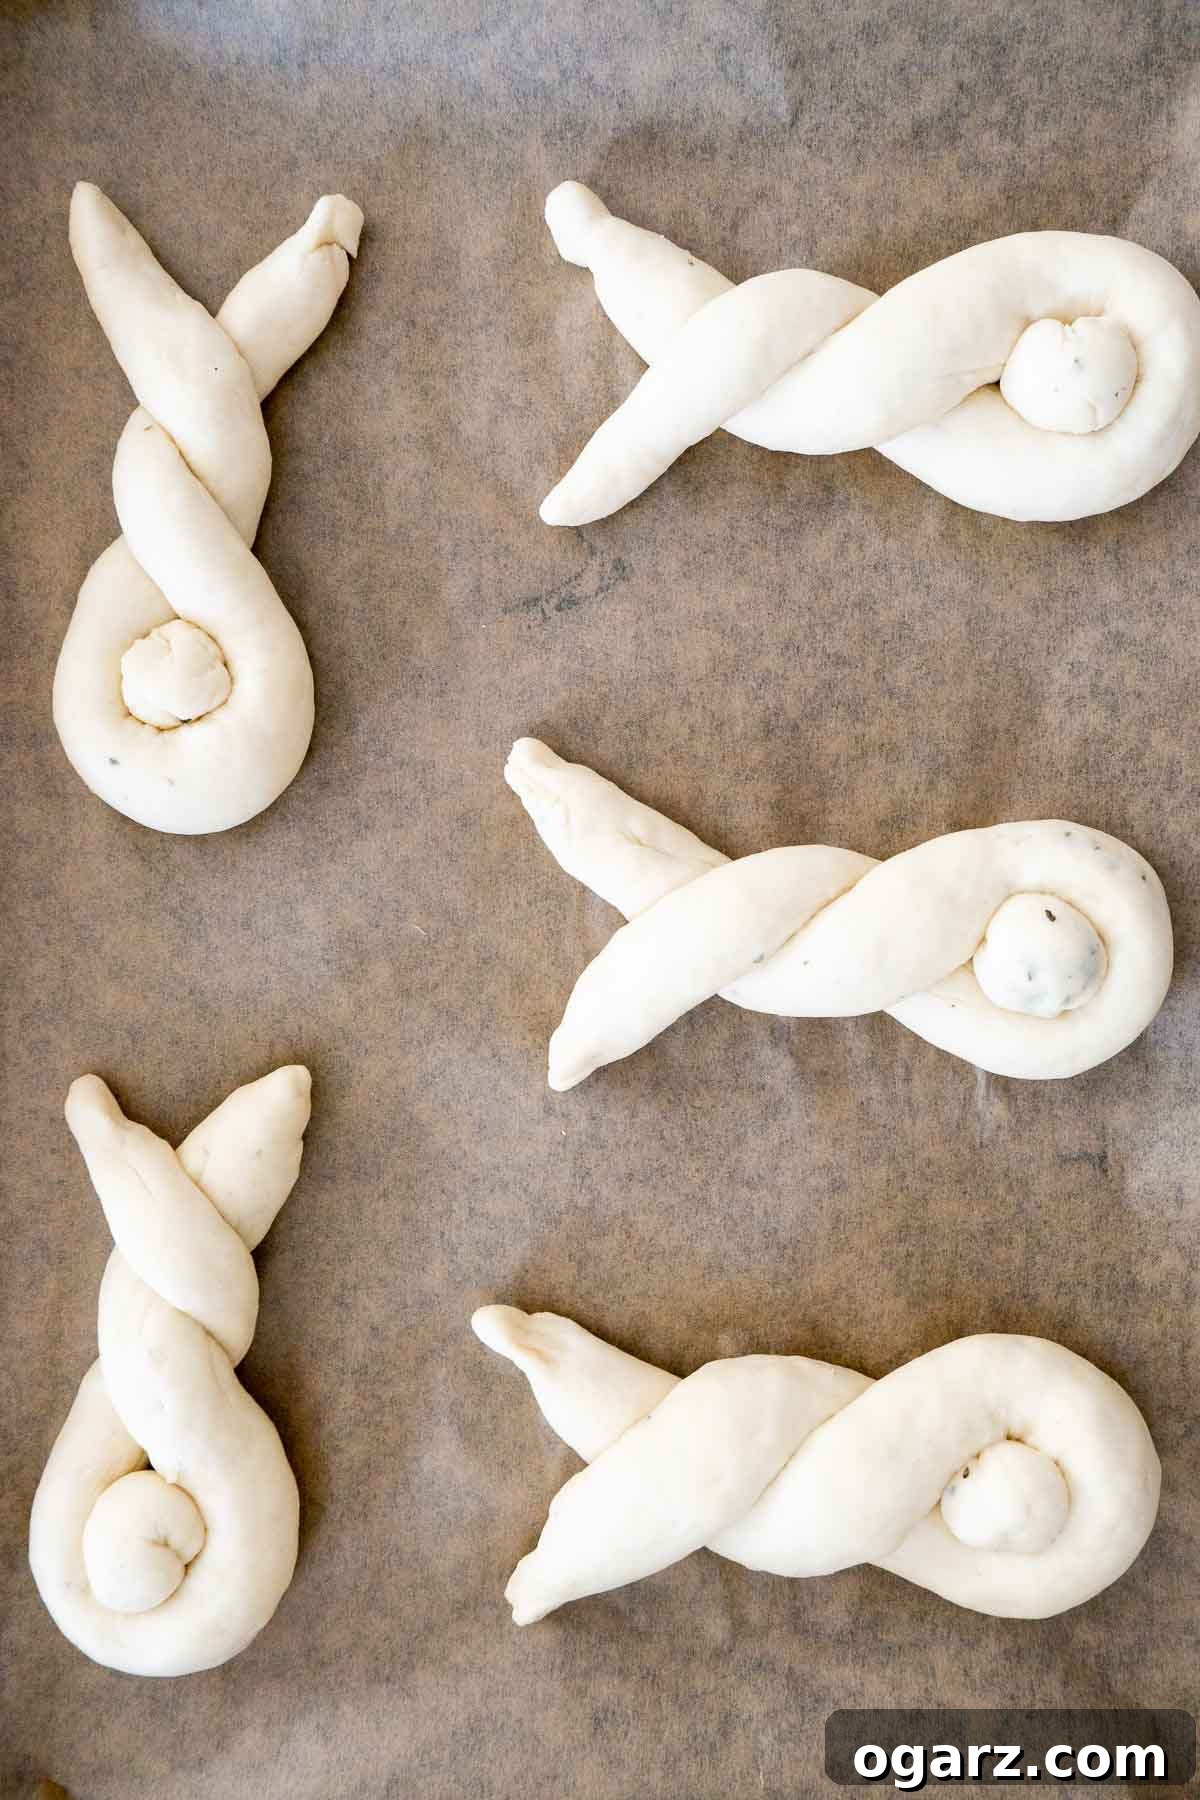
- Roll each dough portion into a rope, approximately 14 inches long.
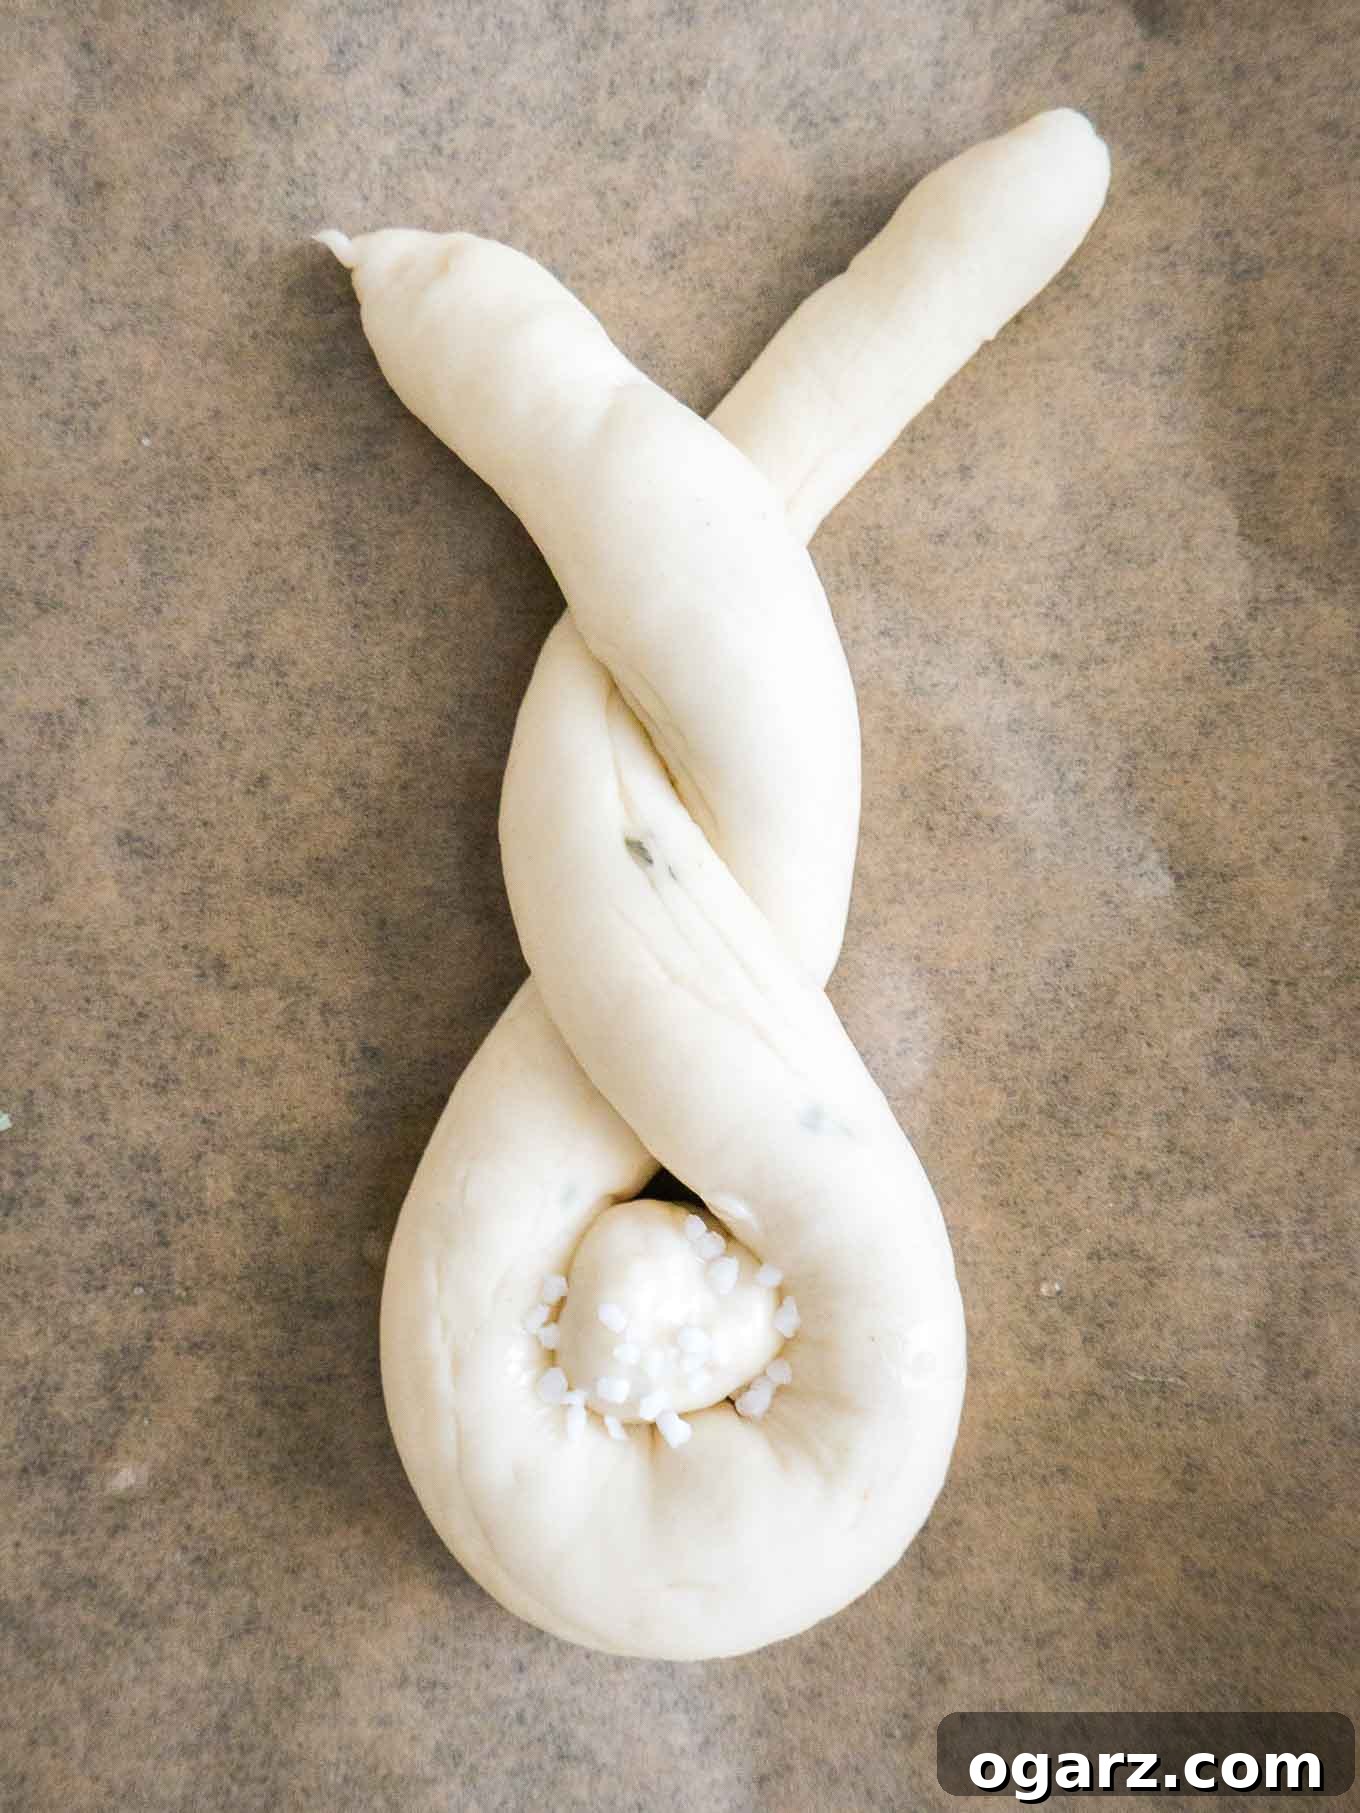
- Cut a small, ½-inch piece from one end of the rope; this will be the bunny’s fluffy tail. Roll this small piece into a neat ball.
- Fold the longer dough rope in half, then loosely twist the two halves together twice. This forms the bunny’s body and ears.
- Place your shaped bunny on a parchment-lined baking sheet. Here’s a crucial tip: gently press down the overlapping ear segment a little bit. This prevents it from puffing up too much during baking, ensuring a more defined ear shape.
- To create the cute cottontail, gently press the small dough ball you reserved earlier into the folded end of the twisted body. Repeat this process for all six bunnies.
Phase 4: Second Rise and Baking to Golden Perfection
After shaping, let your bunnies rest for a brief 5-10 minutes. While they rest, preheat your oven to 350°F (180°C). Line your baking sheet with parchment paper or a silicone baking mat, or lightly grease it to prevent sticking.
Before baking, brush the tails of your bunnies with an egg wash for that beautiful golden color and sprinkle them with coarse sea salt. If you’re leaning towards a sweeter bread, you can easily use coarse sugar instead of coarse sea salt for the tails, adding a delightful sugary crunch.
Bake your Easter Bunny Dinner Breadsticks for approximately 23-25 minutes. Keep an eye on them; they are perfectly done when their tops are a beautiful golden brown and their edges appear cooked through. Remove the rolls from the oven immediately and, while still warm, generously brush each bunny with melted butter. This final touch adds an incredible flavor and a lovely shine.
These fluffy, buttery, and utterly simple-to-make Easter Bunny Dinner Breadsticks are sure to be a hit. And remember, if it’s not the right time of year for bunnies, this versatile dough can simply be shaped into normal, delicious dinner rolls!
Mastering Yeast Dough: Expert Tips for Success
Baking with yeast can seem intimidating, but with these expert tips, you’ll achieve perfect, fluffy bunny rolls every time:
- Verify Your Yeast: Always ensure you are using fresh, active instant dry yeast. Check the expiration date on the package. Old or expired yeast will not activate properly, leading to dense, unleavened rolls. If unsure, you can test it by dissolving a teaspoon of yeast with a pinch of sugar in ¼ cup of warm water (105-115°F) for 5-10 minutes; if it foams, it’s active.
- Room Temperature Ingredients: For optimal yeast activation and dough development, make sure all your ingredients, especially water, oil, and flour, are at room temperature. Cold ingredients can shock the yeast and slow down or prevent rising.
- Thorough Kneading is Key: Kneading the dough is vital for developing gluten, which gives bread its structure and chewy texture. Whether using a stand mixer with a dough hook (for about 4-6 minutes) or kneading by hand (for about 10 minutes), continue until the dough is smooth, elastic, and passes the “windowpane test” (you can stretch a small piece thin enough to see light through it without tearing).
- Patience During Rising: Allow the dough ample time to rise in a warm, draft-free environment until it has doubled in size. This can take anywhere from 30 minutes to 90 minutes, depending on the ambient temperature. Avoid cold drafts, which can hinder yeast activity. A slightly warm oven (turned off, with the light on) can create an ideal rising environment.
- Handle with Care: Once the dough has completed its first rise, avoid overworking it. Gently punch it down to release excess air, then proceed with shaping. Excessive handling can toughen the dough and reduce its fluffiness.
- Don’t Overbake: Keep a close eye on your bunny rolls during baking. Bake them just until they are golden brown on top and the edges appear cooked. Overbaking will result in dry, hard rolls. Baking times can vary slightly depending on your oven, so trust your eyes!
- Achieve the Perfect Tail: When shaping the small ball for the bunny tail, ensure it’s firmly pressed into the twisted body. This helps it stay in place during the second rise and baking.
Common Questions About Bunny Rolls Answered
Why did my rolls turn out dense?
Dense bread rolls are usually a result of the dough not rising properly. Several factors can contribute to this, including using old or inactive yeast, water that was too cold or too hot (killing the yeast), or not allowing the dough enough time to rise in a warm, draft-free place. Always ensure your yeast is fresh and active, and give the dough the full recommended rising time.
Can I substitute active dry yeast for instant yeast?
Yes, active dry yeast can be substituted for instant yeast in this recipe. However, you will typically need about 25% more active dry yeast to achieve the same results (e.g., if the recipe calls for 2.5 tsp instant yeast, use about 3 to 3.25 tsp active dry yeast). Additionally, active dry yeast requires activation: dissolve it in the specified amount of warm water (and a pinch of sugar if desired) and let it sit for 5-10 minutes until it becomes foamy before combining with the other ingredients.
Why is my yeast dough not rising?
There are several common reasons why yeast dough may fail to rise:
- Expired or Inactive Yeast: Always check the date on your yeast packet.
- Incorrect Water Temperature: Water that is too cold won’t activate the yeast, while water that is too hot will kill it. Aim for 105-115°F (40-46°C).
- Not Enough Time or Warmth: Yeast needs time and a warm environment to work its magic. Ensure the dough is placed in a warm, draft-free spot and allowed the full rising time.
- Too Much Salt: While essential for flavor, too much salt can inhibit yeast activity.
- Improper Kneading: Under-kneaded dough won’t develop enough gluten structure to trap the gases produced by the yeast, leading to a poor rise.
Carefully follow the recipe instructions for best results, especially regarding yeast and temperature.
More Festive Easter & Spring Recipes to Try
Looking to complete your holiday spread? Explore these other delightful recipes perfect for Easter and springtime gatherings:
Cakes & Desserts
Irresistible Carrot Cake Cupcakes
Moist, flavorful, and topped with creamy frosting, these individual carrot cake cupcakes are a crowd-pleasing dessert for any celebration.
Bread & Breakfast
Sweet Braided Hefezopf for Easter
A classic German sweet yeast bread, beautifully braided and perfect for Easter breakfast or brunch. Soft, slightly sweet, and utterly delightful.
No-Bake Desserts
Light & Zesty Lemon Mousse Recipe
Refreshingly light and bursting with citrus flavor, this lemon mousse is an elegant and easy no-bake dessert, ideal for spring gatherings.
Cakes & Bakes
Moist Carrot Pineapple Cake
A delightful carrot cake elevated with the tropical sweetness of pineapple, creating a moist and flavorful treat perfect for any occasion.

Print Recipe
Easter Bunny Rolls: Soft, Fluffy & Adorable
Julia Foerster
1 hour 10 minutes
20 minutes
1 hour 30 minutes
6 Servings
Ingredients
- 3 cups all-purpose flour
- 2 ½ tsp Instant dry yeast
- 1 cup warm water (105-115°F)
- 1 tbsp granulated sugar
- 1 tsp salt
- ¼ cup vegetable oil (or other neutral oil)
- 1 large egg (for egg wash)
- 1 tbsp coarse sea salt (or coarse sugar, for tails)
- 2 tbsp unsalted butter, melted
Instructions
-
In the bowl of a stand mixer fitted with the dough hook attachment, pour in the lukewarm water. Add the instant yeast, granulated sugar, salt, vegetable oil, and finally the all-purpose flour.
-
Knead on low to medium speed for about 4-6 minutes, until a smooth, elastic dough forms. The dough should be thick, soft, and only slightly sticky, pulling away cleanly from the sides of the bowl when ready.
-
Lightly grease a large bowl. Transfer the dough to the greased bowl and turn it over once to coat all sides. Cover the bowl tightly with plastic wrap and place it in a warm, draft-free environment to rise until it has doubled in size, which typically takes about 1 hour.
-
Once the dough has doubled, gently punch it down to release any air bubbles. Remove the dough from the bowl and turn it out onto a lightly floured surface. Divide the dough into 6 equal pieces.
-
Preheat your oven to 350°F (180°C). Line a large cookie sheet with parchment paper or a silicone baking mat, or lightly grease the sheet.
-
For each piece of dough: Roll it into a rope approximately 14 inches long. Cut a ½-inch piece off one end of the rope and roll it into a small ball to form the bunny’s tail. Fold the long dough rope in half, then loosely twist it twice to create the bunny’s body and ears. Place the shaped bunny on your prepared cookie sheet and gently press down on the overlapping ear segment to prevent it from rising too high during baking. Press the small dough ball (the tail) into the folded end of the twisted body. Repeat this process for all 6 dough pieces. Let the formed bunnies rise on the cookie sheet for another 5–10 minutes.
-
In a small bowl, whisk the egg for the egg wash. Brush the tails of the bunnies (and if desired, the entire bunny) with the egg wash, then sprinkle the tails generously with coarse sea salt (or coarse sugar for a sweet variation).
-
Bake the bunnies for 23–25 minutes, or until the tops are golden brown and the edges appear fully cooked. Remove the rolls from the oven and immediately brush the tops of each warm bunny with melted unsalted butter. Serve warm and enjoy!
Notes
For additional guidance and troubleshooting, please refer to the “Expert Tips for Success” and “Recipe FAQs” sections above. These cover important aspects like yeast selection, dough handling, and common issues to ensure your baking journey is a triumph!
Nutrition Information (per serving)
Calories: 283kcal
|
Carbohydrates: 50g
|
Protein: 8g
|
Fat: 5g
|
Saturated Fat: 3g
|
Polyunsaturated Fat: 1g
|
Monounsaturated Fat: 1g
|
Trans Fat: 0.2g
|
Cholesterol: 37mg
|
Sodium: 1595mg
|
Potassium: 91mg
|
Fiber: 2g
|
Sugar: 2g
|
Vitamin A: 156IU
|
Vitamin C: 0.003mg
|
Calcium: 17mg
|
Iron: 3mg
Enjoyed this recipe? Share your thoughts below!